How to Harvest Shampoo Ginger for Home Use
Ornamental in the landscape or houseplant jungle, tropical shampoo ginger brings edible qualities and a frothy lather that makes a sweet-smelling, refreshing shampoo. Growing your own yields the pure cleanser when plants produce their captivating pinecone blooms. Gardening expert Katherine Rowe explores how to harness the benefits of shampoo ginger for extended use at home.

Contents
With its distinct floral forms and bracts in deep red, shampoo ginger is eye-catching in summer and fall. Strappy leaves on sturdy stalks create a dense, tropical feel in the warm season. Where it’s happiest, the subtropical Asian species spreads by rhizomes, whether in a bed or container.
Shampoo ginger (also called awapuhi, wild ginger, and pinecone lily) grows outdoors year-round in the mild climates of USDA zones 8 to 10, and overwinters as a houseplant in colder regions.
Shampoo ginger brings a unique dynamism in its ornament and uses, from showy cut flowers to cleansing qualities. Edible features include aromatic leaves, which make a ginger-infused envelope for vegetables, seafood, and meats. The rhizomes, ground or chopped, create an invigorating spice. And the blossoms, with a sweet floral-ginger fragrance, make a pretty edible garnish.
And the real fun of the plant is a soapy, sappy, lather that accompanies its pinecone inflorescences. With a refreshing ginger scent and floral notes, awapuhi produces a rich emulsion harvestable for direct use as a pure and natural shampoo.
To harvest shampoo ginger for this natural shampoo, follow these easy steps.
About Shampoo Ginger

Zingiber zerumbet is in the Zingiberaceae family, which includes culinary ginger and other spices like turmeric (Curcuma longa) and cardamom (Amomum and Elettaria). It also holds numerous ornamental flowering gingers like beehive, red, and shell. The ornamentals and edibles share similar growing requirements, with stalky leaves and thick, rhizomatous roots.
Shampoo ginger originates in India and Southeast Asia. It grows naturally in moist and humid areas along waterfalls and streams, and in fertile soils. Its clumping, reedy stalks can reach seven feet tall, but more often achieve three and a half to four feet outside its range or in containers. Each lush leaf reaches up to one foot long and may be either solid green or variegated, depending on the variety.
With the right growing conditions, the ginger requires little maintenance, whether in the ground or in pots. With its spreading rhizomes, shampoo ginger forms clumping colonies. Growing it in a pot helps control the spread and makes for portable overwintering indoors in cold climates.
When to Harvest

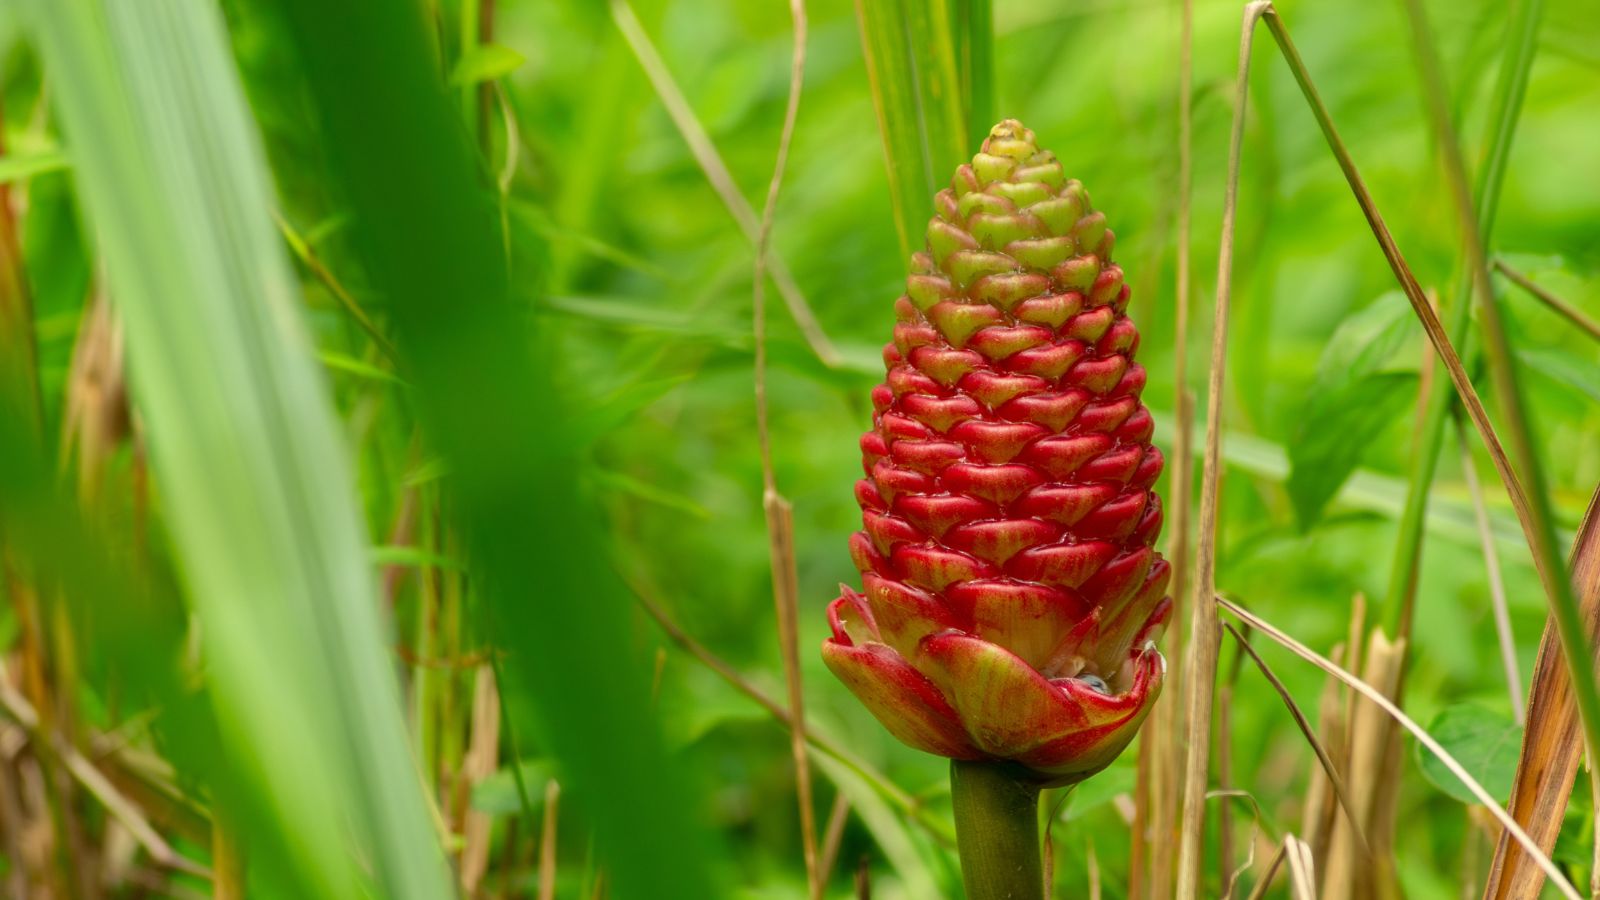
In mid to late summer, pinecone-shaped bracts emerge and persist for several weeks before ripening for a shampoo ginger harvest. Each cone is stout and averages three to five inches long.
The bracts begin lime green and produce small, sporadic, sweetly fragrant white flowers. After flowering, the structures mature to dark red. It’s in the ripe red phase that the inflorescences fill with the sweet liquid. Turning deep red is the indicator that lather from cones is ready to harvest.
Ways to Harvest Shampoo Ginger
There are two primary ways to harvest shampoo ginger for home use. Both involve waiting until the bracts are ripe, either using them on the stem or clipping and extracting the whole cone at once.
Continued Harvest

For a sustained extraction in small amounts, leave the cones on the stem. Apply a gentle squeeze to the entire cone over a container to harvest the shampoo ginger liquid. By taking only a small amount, the cone replenishes. It refills by the next day or two until the spike is spent.
All at Once

For a bigger draw of liquid, clip the stem at the base. Firmly squeeze all the juice from the bracts, working up from the bottom. Hold the cone over a jar or bowl to capture the sappy soap.
Harvesting with a big squeeze means a single use for the bract. Enjoy it on the stem until the final harvesting phase, and plan to preserve the extra juice for future use.
Preserving the Harvest

Use the sweetly floral, ginger-scented “shampoo” fresh, or refrigerate or freeze it to extend the shelf life. Shampoo ginger, a natural plant extract, doesn’t last as long as regular shampoos. Use it on the day you harvest shampoo ginger, or divide the yield into ice cube trays. Freeze the tray for ready-to-use portions.
Wild ginger lasts for a few days in an airtight container in the refrigerator, and a few months in the freezer. Use it as a sole hair shampoo or conditioner, or add it to existing formulas for a fresh gingery infusion.
Overwintering the Tropicals

Awapuhi performs as a houseplant year-round, though it benefits from warm summer months outdoors for a vigorous growing season. The tropical specimens are frost sensitive and don’t withstand temperatures below 40°F (4°C). In cold climates, bring them inside or move them to a greenhouse as temperatures drop in the fall.
Even in its subtropical and tropical growing range, wild ginger enters winter dormancy, where it experiences dry conditions. There are two primary ways to overwinter plants outside their hardiness zone. For in-ground specimens in northern climates, dig and lift the plants when temperatures dip into the 50s or upper 40s (around 10°C or 4°C).
Gently shake soil clumps loose (remaining soil attached to the roots is fine). Store the dormant plant in a paper bag in a cool, dry spot like a basement or garage. Replant it after spring’s final frost and as temperatures remain in the 50s and 60s and above (around 10°C or 16°C).
The second way to overwinter wild ginger is as a potted houseplant. A high-quality potting mix offers an organically rich, well-draining foundation with good aeration and moisture retention. Pots with drainage holes are essential to prevent root problems, especially during dormancy.
Optimal Lighting

When bringing the pot indoors, situate it where it receives bright, indirect light. A bright window, out of direct sunlight, offers the best position. Direct sun, especially afternoon rays, can scorch stems and leaves.
East-facing windows allow plenty of morning sun exposure. South-facing positions offer the most light, especially on short winter days. Place pots slightly away from the window or use a curtain to filter intense rays. Keep the tropicals away from cold window panes in the winter months.
Ideal Temperature and Humidity

Wild ginger requires warmth to grow and flower, with ideal growing temperatures in the low to mid-70s (21°C). In the cool, dry season, growth naturally slows and dormancy ensues. In the fall, leaves turn yellow and brown and drop. Cooler temperatures and shorter day lengths trigger dormancy.
For pots overwintering indoors, transition them back outside in the spring after the last frost and when temperatures are consistently above 50°F (10°C). Average room temperatures are usually sufficient to support indoor growth.
Ginger loves high humidity, and levels around 50 to 60% are optimal. This is average in our homes, though winter factors like heaters, fireplaces, and vents can be drying. To raise the ambient humidity around the houseplant, place the pot near a tray of gravel or pebbles filled with water.
Group houseplants to create a microclimate that boosts the immediate air moisture from soil, evaporation, and transpiration. A humidifier is a sure bet for maintaining consistent humidity and raising levels quickly.
Watering Regimen

In the growing season, evenly moist soils are optimal for the tropicals. During winter dormancy, they need infrequent watering as roots aren’t actively taking up moisture, and evaporation slows.
When the soil surface feels dry to a couple of inches deep (about two knuckles), water deeply. The watering frequency may be every few weeks or so to avoid the soil from drying out completely. Avoid oversaturation and soggy media, which can cause fungal problems like rot for the dormant rhizomes.
Use tepid or lukewarm water at each session to promote humidity and avoid shocking the roots. Water deeply until it runs through the container’s drainage holes. Empty catchment saucers shortly after pots have time to drain to avoid excess moisture absorption.


