How to Root Spider Plant Babies: 7 Pro Tips
Spider plants naturally sprout dozens of babies along their stems. The sprouts grow roots and leaves that make them easy to propagate. Discover these seven pro-propagating tips alongside longtime houseplant grower Jerad Bryant. Help ensure each baby grows healthy and strong!


Contents
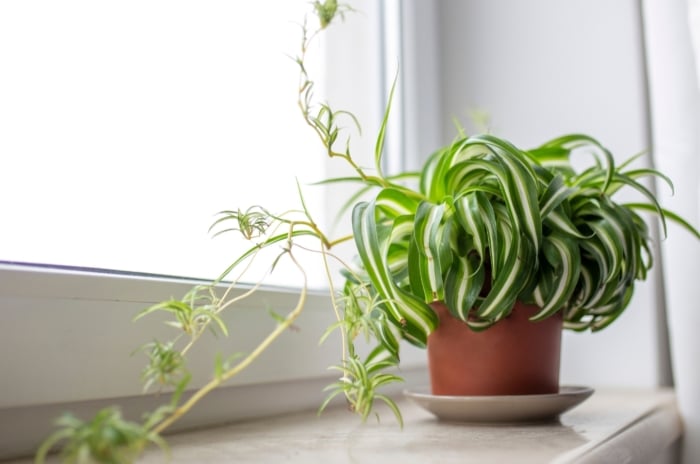
Spider plants are low-growing forest dwellers of the genus Chlorophytum. They’re native to parts of Africa where they bask in dappled light that larger trees and shrubs provide beneath their canopies. As days shorten and nights lengthen, they begin sprouting white flowers off of long, spindly stems. When successfully pollinated, the flowers evolve into small fruits with seeds inside.
After the fruits or flowers fall off, baby spider plants, or “spiderettes,” grow in their place. They start small, sprouting tiny aerial roots and narrow, short leaves. The babies develop into clones of the mother plant as the days begin lengthening again. They use the clones to spread into new areas nearby, and they’ll quickly cover bare sites in warm regions.
These spiderettes simply hang in place in containers or baskets. Without access to soil, they grow more roots and leaves until they fall off the plant. Mature spider plants may have dozens or more babies hanging off of them.
Knowing how this process works, we can manipulate spider plants to grow how we want them to for easy propagation. Use these seven tips to transform one plant into many more!

5″ Cube Pot

Fantastic for starting larger vegetables like pumpkins, squash, melons, or cucumbers. Also great to pot up smaller seedlings from our Epic 6-Cell or Epic 4-Cell trays. You can even grow herbs and smaller veggies directly in this large, durable 5″ pot.
Choose Mature Spiderettes

The first step towards success is propagating babies that have ample roots and leaves already. If you start with small specimens, they may take many days or weeks to reach a mature size. Start big, and you’ll save time later on!
Locate the mature babies you want to grow, then snip them off the stems. Remove any leaves growing downward into the roots so that the leaves situate upwards and the roots go downwards.
Once you snip the spiderettes off their stems, they won’t have access to the original plant’s moisture and nutrients. Keep them in water or place them in an airtight container with a moist paper towel until you’re ready to use them.
Root Babies in Water

The easiest way to encourage roots on spider plants is by growing them in water. A glass, some water, and light are all the things you need to propagate spider plant babies. Place each one into a container, then add the liquid so it covers the existing roots. Place these jars near bright indirect light on a windowsill, countertop, or shelf.
The sprouts will continue growing roots, and all you’ll have to do is make sure the jars have water in them. If you lack access to bright indirect light indoors, consider adding grow lights to your setup. They hook up easily to a timer and will turn on and off every day. Simulate the sun’s day and night cycle by having them turn on at sunrise and off at sunset. Then, offset the spiderettes a couple of feet away from the lights to avoid burning.
The plants suck more moisture from their jars as they grow larger. Ensure their containers stay full, and add fresh water to them every week or two if they don’t drain completely. Stagnant liquid causes diseases, so it’s best not to let the babies sit in the same medium for longer than two weeks.
Use Soil Instead

The downside of water propagation is that you’ll have to put the rooted spiderettes into the soil, eventually. They’ll live many months inside jars with some fertilizer, although they’ll remain slow-growing with little new shoots. Consider growing them in soil from the beginning so you only have to transfer them once. I like to root them in water, and then transition them to pots with dirt. You should do whatever works best for you and your growing setup!
To root spiderettes in pots, place them into medium-sized containers with soil. Bury their roots with potting soil and leave the roots uncovered so they can access light and air. Moisten the soil well, then place the potted plants under bright indirect light or near grow lights.
The potted spiderettes will need some weeks of growth before they’re ready for transplanting or repotting. Let them grow until they fill out their pot. You’ll see roots spreading out of the drainage holes, and the soil will dry quickly as the plants grow root-bound.
Maintain Consistent Moisture

Spider plants tolerate short dry periods though they prefer consistent moisture. Young spiderettes need plenty of moisture as they have fewer roots than mature specimens. They’re more susceptible to drying out. If you’re propagating the babies in water, then consistent moisture is not a problem!
Watch potted specimens closely to ensure their soil stays moist, but not soggy. Water every week or two as the top layer of soil dries. If unsure, try using the finger test to know when to irrigate. Simply stab your finger into the pot and see if you sense moisture below the surface. If it’s wet, hold off on watering, and if it’s dry, apply plenty of water so it flows freely from the drainage holes.
Moisture is more of a concern for outdoor specimens. Summer sun and warmth can dry potted plants quickly, causing weak growth and dying leaves. Consider propagating indoors so you have more control over moisture levels, or set out a sprinkler on a timer to keep outdoor specimens well-watered.
Offer Bright Light

Outdoors, these perennials grow under dappled sunlight or deep shade. They’re low-light lovers that work well where other plants struggle. Indoors, your specimens need bright but indirect sunlight. This exposure is ideal for most houseplants, and it works exceptionally well for spider plants.
Indoor shade is much different from outdoor shade. There’s plenty of ambient light outside that reflects off of leaves, soil, and water. They light up the leaves and allow the plants to photosynthesize. Indoors, these light sources are infrequent in shady sites. Shade in our homes may mean there’s no light at all or that it only exists from artificial sources.
Instead of placing spiderettes in the shade inside your home, offer them bright indirect light for most of the day. Grow lights are often too intense for the young sprouts, especially if they’re close to them. Situate the propagules a couple of feet away from the lights, or no more than 4 feet away.
Provide Humidity and Warmth

Temperature and humidity are two other crucial factors for maintaining healthy spiderettes. These perennials prefer warm temperatures year-round to thrive. They dislike cold and are frost-tender. They’ll thrive outdoors year-round in USDA hardiness zones 9 through 11, and they prefer growing as houseplants in zones 8 and below.
When growing these plants indoors, provide plenty of warmth and humidity. Avoid situating them near drafty windows, doors, or heaters. Although heaters provide warmth, they zap the air of moisture and lower humidity levels.
If your home has low humidity, consider adding a humidifier to the mix. This simple machine turns water into vapor. Place it in the same room as your houseplants to keep them moist, happy, and healthy.
Bonus Method: Let Them Hang

There’s another fun way to grow spiderettes! Instead of snipping them off and planting them separately from the parent plant, you can leave them be. This method takes advantage of the connection the babies have to the parent plant, as they use its resources to bolster themselves.
Try this technique by first locating large spiderettes. Without snipping them off, place them in jars of water or pots with soil. Cultivate them like you normally would following the tips above, and leave them on the stems until they resemble mature specimens.
Don’t worry if you forget to water them, as the stem connection makes them stronger than normal propagules! Once they reach a mature size, you can snip them off their stems and plant them where you’d like them to grow. They’ll likely last for 20 years or more!