Does Your Orchid Have Yellow Leaves? Here’s What To Do
Does your orchid have yellow leaves? This can happen for a variety of different reasons, some of which are easy to fix. In this article, gardening expert Melissa Strauss looks at the different reasons your orchid could have yellow leaves and how to address them.


Contents
First of all, take a deep breath, and step away from the watering can. We will get to the bottom of this together, and hopefully you found your way here before the situation becomes dire. It’s easy to panic when those gorgeous, waxy green leaves turn a sickly shade of chartreuse and start to look a little loose on the rhizome.
Orchids require a lot of effort to maintain. Some types of orchids require a great deal of effort to obtain, and they can be quite pricey as well. Those factors add to the stress of seeing an issue that we don’t know how to correct. Diagnosing yellowing leaves in an orchid can be quite simple, or rather complex, but if caught early enough, it is usually possible to save the plant.
Keep reading to explore the most common cause of yellowing orchid leaves. You’ll also learn about a few other potential issues that may crop up along the way.
The Short Answer
The most common reason an orchid’s leaves are turning yellow is from overwatering. Orchid roots need a lot of air circulation and hate to be kept damp and soggy. Soggy roots are prone to root rot, which makes the plant vulnerable to many different issues. Other causes could be not enough, or too much sunlight, as well as pests or fungal disease. Orchids need a special balance of water, light and humidity to thrive indoors.
The Long Answer
There are seven common reasons why orchids have yellow leaves. From what we’ve already talked about with overwatering, to sunlight imbalances and disease, it’s important to get to the root of the issue so you can properly address it. Let’s look at the seven most common reasons that Orchids develop yellow leaves.
Too Much Water
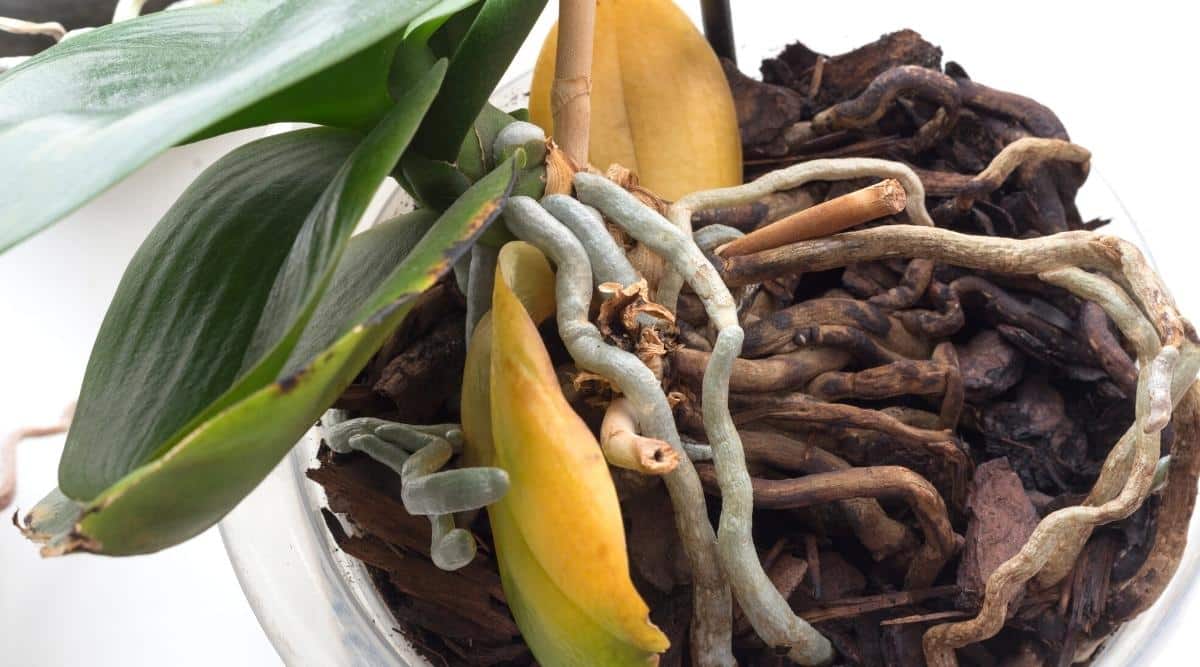
The prevailing reason that orchid leaves turn yellow is that they are being overwatered. This can mean that they are being watered too frequently. It can also mean that they are in a container that doesn’t allow for adequate drainage.
This is especially true of orchids living inside the house. It can be very difficult to achieve an environment that mimics their natural habitat. All of these mistakes are quite common with novice orchid owners.
The majority of orchids are air plants. They absorb most of the water and nutrients they need from the air around them by way of central root systems as well as aerial roots. As such, air circulation is very important to the health of the plant. When we bring orchids inside the home, we alter the way they get the water they need.
By placing them in containers, we inhibit the airflow around the roots. If we water too frequently, the potting medium doesn’t have time to dry out, and the roots will become soft and mushy. Your orchids will then become susceptible to root rot.
The Fix
Repotting your orchid can solve this problem if it is caught early enough. Choose a container with lots of drainage and openings for the air to circulate. Use a specially formulated orchid potting mix comprised primarily of bark, as regular potting soil will inhibit air flow and stay moist for too long.
When repotting, use a clean sharp tool to cut away any damaged roots and leaves, and treat all cuts with an antifungal agent, such as powdered sulfur. Finally, reduce the frequency of watering.
Orchids survive underwatering far better than overwatering. Kept indoors, orchids only need to be watered once per week, and the potting medium should be allowed to dry completely between waterings.
Not Enough Light

Another issue orchids face indoors is a lack of adequate light. If you notice a general fading of your orchids leaves to a pale yellowish green, try moving it closer to a brightly lit window. Most species of orchids like many hours of bright indirect light daily.
Without adequate light, the plant is unable to produce chlorophyll through photosynthesis. The result is a general fading of the leaves. Inadequate light will also inhibit the formation of buds, so flowers will be scarce, if present at all.
Other signs of orchids with a lack of sunlight include leaves that start to droop or wilt after they have started to yellow.
The Fix
This is fairly straightforward. You’ll need to move your plant to a sunnier location. You can choose a new permanent location, or choose to rotate your plant into different locations as needed. Allowing enough sunlight will ensure they stay healthy, and also encourage blooming.
Too Much Direct Sun

The flip side of the light dilemma is that orchids don’t love direct sun. Some species, like vanda and cattleya orchids, can tolerate a few hours of direct morning sun, but in general, the best light for an orchid is indirect, but bright light.
If you notice that the top leaves, or the leaves that receive the most light are beginning to look pale and have a bleached appearance, it is probably getting too much direct sun. You may also see blooms start to drop. Try moving it to a spot that doesn’t get direct sun exposure or consider filtering the sunlight with a sheer curtain.
The Fix
Once an orchid leaf is sunburned, it can’t be saved and will most likely begin to rot. If you see a leaf begin to turn black and mushy, it needs to be removed so that other leaves are not infected. You can get out ahead of any problems and prune any yellowing leaves early if the edges are starting to get a little crisp.
Not Enough Humidity

Orchids are native to tropical and sub-tropical climates, which tend to be quite humid. There is a fair amount of moisture in the air for their aerial roots to access, and all they need otherwise is a good soaking rain every so often.
Their epiphytic growth means that their roots do not need or like to be surrounded by damp potting medium. But rather, they thrive in high humidity. 60%-80% is a good level for most orchids. This can be difficult to achieve indoors, as most people don’t like that level of humidity in the home.
The Fix
Placing your orchid in a brightly lit bathroom is ideal. If you need to increase the humidity around your orchid, you can use a humidifier, or place the pot atop a dish filled with water and some stones. The stones are necessary to elevate the pot.
Their roots should never sit in water; this will cause the dreaded root rot. Misting an orchid can also be helpful, but take care not to allow water to pool in the leaves and flowers, as this can cause them to rot.
Pests
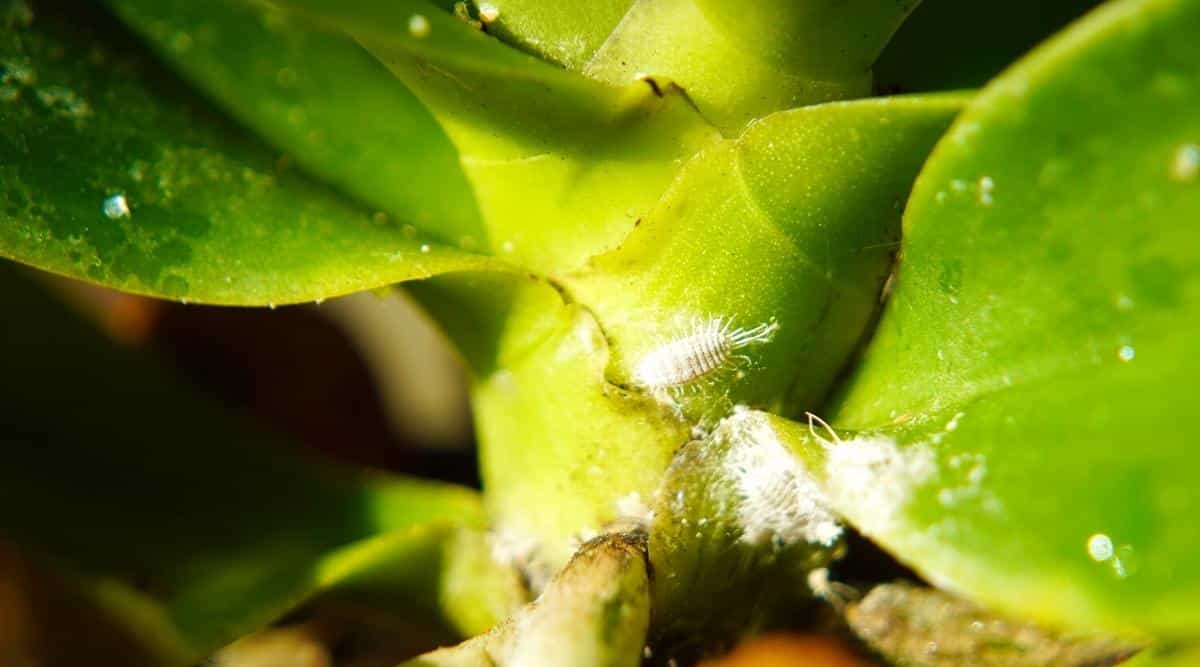
Another culprit of yellowing, and generally unhealthy-looking leaves are insects that feed on the nutrients in the plant. If your orchids leaves are yellowing or showing brown spots or shriveling of new growth and flowers, there’s a good chance you have an insect problem. Mealybugs, aphids and scale are all fans of orchids and can drain a plant of the adequate nutrients very quickly if not dealt with.
Mealybugs are white and fluffy, and easy to see. They like to hide in tight places so look in the junctures of leaves. They also leave behind white residue. If an infestation is caught early, mealy bugs can be removed with isopropyl alcohol on a cotton swab. If the infestation is severe, repotting and disposing of infected potting mix is recommended.
Aphids are easy to see, they look like small white worms and like tender new growth. Alcohol is useful in removing aphids as well but can be more abrasive than a simple solution of dish soap and water, which is very effective at combatting aphids. Once the aphids have been treated, make sure to rinse the plant and dry up any water that settles into the leaves to avoid rot.
Scale are insects that form cocoons on the underside of leaves which can be scraped off with gentle pressure. Manual removal works well on areas that can be seen. Again, if the infestation is severe, repotting and treating with insecticide may be necessary.
The Fix
As mentioned with each pest, they all have different remedies. Usually, repotting with a fresh potting mix is encouraged, regardless of the type of pest. Make sure once replanted, that you avoid root rot at all costs.
Fungus

Fungus is a double-edged sword for orchids. Orchids seeds germinate in the wild by attaching themselves to fungus which help break down the nutrients they require. This fungus remains on the roots and is beneficial, and even necessary for the health of the plant.
Fungus becomes a problem when another issue is affecting the integrity of the roots. Fungi feed on dead tissues, so they become a problem when another issue is causing tissue death. The most common reason for a fungal infection in an orchid is overwatering.
The Fix
Treat the plant for overwatering, repot, trim off any affected tissue with clean, sharp tools, and treat cuts with a fungicidal agent.
It’s Natural

It is completely natural for old leaves to eventually turn yellow and fall off. A mature orchid will lose about 2 leaves per year, naturally.
The old leaves store nutrients and water for the development of new growth. Once these leaves are exhausted of their nutrients, they will simply fade to yellow and fall off naturally.
The Fix
If the oldest leaves on the plant are turning yellow and no other leaves appear to be affected, just let nature run its course. When those leaves have fulfilled their purpose for the plant as a whole, they will fall off on their own.
Resist the urge to prune them off. As long as they are attached to the plant, they are supplying valuable nutrients.
Final Thoughts
Usually, when we look at how a particular plant appears in the wild, we can deduce how that plant needs to be cared for in our homes. In nature, most orchids are epiphytic, growing in the air, attached to the bark of a tree. Their roots naturally grow into and around the bark of the tree. This supports the plant and allows it to absorb moisture and nutrients from the air around it.
Mimicking this environment as closely as possible is the best way to ensure a long, healthy, flower filled life for your orchids. Striking the right balance of light, water and humidity will solve 90% of the issues related to yellowing orchid leaves.


