How to Grow Coneflowers From Seeds in 7 Easy Steps
Coneflowers are great pollinator-attractant plants native to much of the Eastern and Central United States. Join gardening expert Melissa Strauss for seven easy steps to grow them from seeds.


Contents
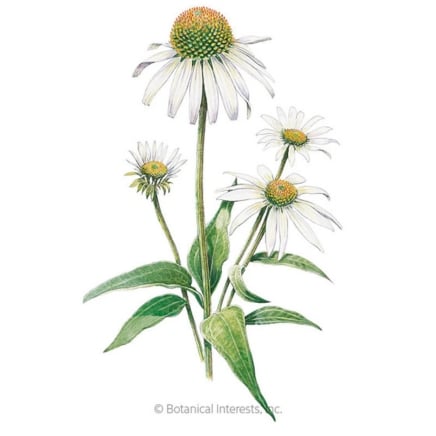
Coneflower, also known as echinacea, is a group of herbaceous perennials native to a significant portion of the Eastern and Central United States. It is a member of the daisy family. Throughout history, it’s been used as a medicinal herb, and it also makes a wonderful addition to the pollinator garden.
The plants form a mound of rough, dark green foliage in their first year. If you start them far enough ahead of time, you may see them flower in the first year, but typically they bloom in their second year. The blooms are recognizable for their large, spiky, central cone. Long, thin ray petals grow in a ring around the cone. The most common species has purple flowers, but there are many others that come in shades of white, yellow, orange, red, and pink.
Planting coneflowers from seed in your garden is a guaranteed way to attract pollinators, including bees, butterflies, flies, beetles, moths, and wasps. They are great, low-maintenance, drought-tolerant perennials that bloom for an extra long period through summer and until the first frost, sometimes even beyond. Let’s talk about how you can grow coneflowers from seeds in your own garden.


Step 1: Cold Stratify

Some seeds require cold temperatures to assist them in germination. This is common among plants that grow in cooler climates. In their natural environment, the seeds drop in the fall and spend the winter freezing and thawing. This helps to break down the outer shell, allowing moisture to penetrate the embryo and initiate germination.
Coneflower is one of these plants that benefit from cold stratification. One way to do this is to sow directly in the garden right after the first freeze. This allows them to naturally experience that cold weather and germinate as soon as temperatures allow in the spring. This involves directly sowing your seeds in the soil. For our purposes, we are going to focus on growing these indoors from purchased seeds.
This means you’ll need to artificially cold-stratify the seeds before you can start them. These particular plants need moist stratification rather than dry. You can do this by wrapping the seeds in a moist paper towel and placing them in a plastic bag or other container.
Check your paper towel weekly to ensure it remains moist. Don’t worry about sprouting because of the moisture; the temperature will keep them in their dormant state. Leave them in the refrigerator for three to four weeks before you start them.
Step 2: Start at the Right Time

For spring-planted coneflowers, you can directly sow in the garden after stratifying, about two to four weeks before your last frost date. We are going to start our seeds indoors, though, so we want to start much sooner. If you start them early enough, you might get some flowers in the first year.
If you want to get a solid jump on starting your seeds so that they will flower the same year, expect to start about 10-12 weeks ahead of that last frost date. This will leave you with strong seedlings to transplant.
To devise a formula for stratifying and starting your coneflowers, locate your last anticipated frost date. Count back 10-12 weeks from that date, and mark this as the date you will put your seeds in the soil. Count back an additional four weeks; this is the date to begin stratification.

Step 3: Prepare Trays


Echinacea isn’t picky about soil, it adapts well to clay, sand, loam, or rocky soil. Wet, mucky soil is the only condition these plants don’t tolerate. When it comes to starting your coneflowers from seeds, you can technically use almost any potting mix. However, a good quality seed starting mix will give you the most optimal results.
Seed starting mix is a sterile, soil-less medium made for precisely this purpose. It’s lightweight and airy, allowing for maximum root development, and free of potentially harmful pathogens like mold or bacteria.
I prefer to moisten my potting mix before putting it into my cells because it absorbs better this way. You can use your hands or spade to mix water into the medium and then fill your trays with the moistened material. I find that when I fill my trays and pour water over the top, it tends to go straight through.
Fill your cells with the moist potting mix, and set them on a tray to catch any water that runs through. Or form some soil blocks, which are well suited to sowing wildflower seeds like echinacea.
Step 4: Sow Your Seeds

When it comes to sowing depth, a specific factor plays the biggest role. This is whether they require light to germinate. Some require light, while others need darkness. Coneflowers belong to the first group; the seeds need sunlight to initiate germination.
When seeds need light to germinate, it is commonly recommended that they be surface-sown. This means laying them on top of the soil and gently pressing them without covering them up.
This is the case for echinacea. You can either surface sow them or lightly cover them with soil to hold them in place. Don’t bury them, or your germination rate will be lousy. Set your trays in a spot with bright but indirect light or under a grow light.
Step 5: Monitor Germination and Growth

Different plants have different germination times and sprout at different temperatures. Echinacea seeds germinate at about 65-75°F (18-24°C). It takes between 10 and 21 days for them to sprout, so they require some patience. If you pass the three-week mark and no action takes place, something probably went wrong.
Once they sprout, move your seedlings closer to the light source. They shouldn’t be in full, direct sunlight, but they should get bright light for most of the day.
Keep the soil moist but not wet. You can do this by misting them with water, watering from the bottom, or carefully watering from the top. If the soil stays wet, you may encounter damping off. This is when your seedlings seem to die off quickly, wilting and falling over. It’s caused by a fungal infection in the wet potting mix.
Step 6: Harden Off

Before transplanting, you’ll want to harden off your seedlings. Begin this a week or two before you intend to transplant them to their final home. During the day, put your trays outside in a sheltered but brightly lit location. Gradually increase the duration and the amount of light they receive over the following days.
If you expect freezing temperatures overnight, make sure to bring your plants back indoors. Once you reach the point where they are spending all day outdoors and their stems have grown thick and sturdy, it’s time to transplant.
Step 7: Transplant

Prepare a bed for your coneflowers by loosening the soil and mixing in some well-rotted compost or manure. This will supply them with nutrients that break down slowly and feed them throughout the season. Once they start blooming, you can apply water-soluble fertilizer with higher potassium and phosphorus, but for now, rich soil will do the job.
Coneflowers prefer full sun, though they will tolerate some shade. In warm climates, a bit of afternoon shade will prevent sun scorch. Just make sure they get about six hours in the early part of the day. Make sure that the location you choose has good drainage.
When your seedlings are three to four inches tall and hardened off, it’s time to transplant them. Choose a cool or slightly overcast day and do your work early in the morning. You’ll want to water them after planting them, and you don’t want to start them off on the road to powdery mildew by watering too late in the day.
Dig your holes as deep and twice as wide as your root balls, then water the holes and allow the water to absorb. Gently remove your seedlings from their cells or pots and place them in the holes. Carefully backfill around them, firming the soil around the top.
Apply mulch around the base to protect the roots and help the soil to retain moisture. This also insulates the roots, as you’re likely to have some cold weather before it warms up for the spring. Keep the soil moist but not soggy while your plants are establishing roots, and then care for them as mature plants once they’re well rooted.


