DIY Plant Markers: How to Label Your Plants Effectively
Are plant labels confusing? In this detailed guide, horticultural expert Sarah Jay will demystify the standard information on plant tags and give you ideas for making your own!


Contents
Have you ever planted seeds excitedly, only to wonder later what exactly the sprouts are? I just did that this fall. The season would have been far more organized if I had developed tags for my plants before starting!
Plant labels are an important way to identify plants in your garden. You can design your own labels that will last through many a season and provide the information you need. The benefit of making a plant label is you can put whatever info you want on them. Make this an element of your winter tasks before the spring season arrives for better organization.
Let’s discuss the information on plant labels and cover how you can make your own.
Botanical Interests Garden Stakes 12 Pack
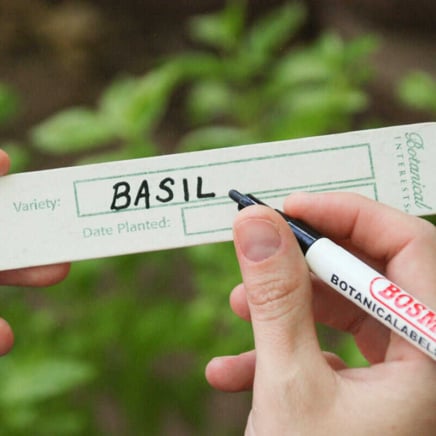
Our USA-manufactured stakes are made from a sustainable and renewable source of White Birch grown and harvested in New England. The untreated wood is biodegradable and eco-friendly.
Simply put them in your compost bin after the season is over. Each 12″ stake includes a space for noting the variety name and date planted.
Why Are Plant Labels Necessary?
Plant labels have so much more than simply the plant name. They can also include detailed information about plant care, growth habits, and more. In professional settings, like nurseries, arboretums, and demonstration gardens, plant markers help buyers determine which plants grow best in specific settings.
In a home garden, labels can be just as instructive. They can indicate how to care for a plant, how to space it, and how it will grow throughout the season. They can also be there simply for the practical purpose of helping you identify which plants you direct seeded in a spot. This is especially useful for root veggies and transplant-shock-prone plants that really need direct seeding to thrive.
Plant tags are great for beginner gardeners and are especially useful in kid-friendly gardens. In a garden full of herbs, plants may look very similar. Having some indication of which is which and how to work with them is provided by a plant marker.
How to Read Plant Labels
What information is present on most plant markers? That may vary, depending on the purpose. Here, we’ll cover all the potential information listed on plant tags.
Common and Scientific Names

Both the common and scientific names on a plant tag are important to understand more about a plant. Common names suggest colloquial understandings of a plant. However, there’s a level of ambiguity to common names, especially when they overlap across different plant species.
Common names are used by people in a given region and vary widely depending on where you are. As an example, consider the Boston fern. While it’s called that in one region, it can also be referred to as sword fern, fishbone fern, or even tuber ladder fern.
It’s pretty easy to mix up. While someone in Massachusetts might call it Boston fern, a person from Hawaii would call it kupukupu! How do you find the plant you’re looking for?
That’s where scientific names come in. Here, there’s little to no ambiguity about the plant in question.
Within each plant type, there are also varieties or cultivars to consider. For example, if you’ve planted multiple species of zinnia, you need to know which one is growing where. Knowing these things will help you in your future garden.
Plant Placement

The label can include plant spacing and planting depth for seeds too. Knowing how deep to plant seeds on a reproductive and established plant is helpful for sowing ahead of the season. Understanding how far apart a plant should be from another is important as well.
This gives you some idea of whether or not temperate season division should occur or when to prune a plant back.
Hardiness Zones

Knowing where a plant is hardiest helps you decide which will do best in which season in your USDA hardiness zone. Or, it will tell you when to bring potted plants inside for protection.
While this is important, couple your understanding of your regional climate with this information. Consider the projected first and last frost dates to know whether or not a plant is best in-ground or in a container.
Plant Description

Plant labels may also include the height, spread, and growth habits of plants. Knowing how tall or wide a plant gets gives you an idea of where best to place it. The same goes for knowing which color flowers the plant produces and understanding how it reproduces.
If it crawls in the garden, it needs space. If it spreads by seed only or by trailing rhizomes, you’ll want to understand this before placing.
Also, the kind of plant you’re growing tells you which garden to plant in. Maybe you like to keep herbs separate from flowers, or perhaps you have native plants in one area and annuals elsewhere.
Plant Care Needs

Finally, plant labels can tell gardeners how to care for them. This includes information about soil, water, temperature, and fertilizer needs. Among all the practical information included on plant tags, this may be most beneficial to people who don’t want to keep track of plant needs elsewhere.
Much like the rest of the information we’ve covered so far, with plant care listed on a marker, you’ll know how to place the plant in question. Even more important is the appropriate planting season and nutrition needed. Often the fertilizer NPK (nitrogen, phosphorus, potassium) is listed.
DIY Plant Labels
Now that we’ve quickly run down the information that may or may not be present on plant tags, let’s discuss different ways to make your own at home. To start, we should indicate there are no hard and fast rules here. Create your own plant markers in whatever style and for whatever purpose you need.
You don’t have to include every little piece of info, and including only what you need is always best.
Repurposed Household Items

The most eco-friendly way to make your own plant markers involves repurposing materials you have lying around the house. Use leftover lumber to make larger wooden plant markers. Upside-down bottles buried partially in the earth are a creative and easy way to display plant names outdoors. They’re also waterproof.
Plastic is just as durable, and its reuse is important. Rather than send plastic containers to the landfill, cut them up into pieces and place them next to your plants. Just like glass, plastic is also water-resistant. Use a long-lasting permanent marker like a Sharpie or paint marker to ensure your label lasts.
Other materials, like metal leftover from silverware or even wooden spoons, add a unique design aesthetic. Take time to hammer old silverware into a flattened shape that can easily be engraved.
One cool way to make plant markers is to repurpose rocks and stones. Spending time with your kids or family to paint rocks with the names of plants is fun. Place the markers around the garden after you’ve sealed them or weatherproofed them in some way.
Have old terra cotta pots lying around? Break them up and use them as labels, much like you would rocks. Use terra cotta permanent markers to draw and write on the surface of the pieces, and lay them or prop them up in the garden.
One really simple way to display a label is to seal and weatherproof the seed packet and stick it on a stake near the plant in question.
Hand Painted Plant Markers

For creative gardeners, make your own sign with stencils and weatherproof paint, adding information to leftover plastic old plant tags. You can even use glass bottles, broken ceramic, or terra cotta. Metal pails work, too, if you prefer metal as a material displayed in the garden.
Laminate the paper to promote durability if you’re working on paper attached to the tips of popsicle sticks or stakes. Instead of lamination, you can hang an upside-down bottle over a paper label to keep it somewhat safe in rain and wind. Wire hangers work if you don’t have access to wood stakes or dowels.
Painted tiles or rocks placed around each site in herb gardens are an attractive way to provide information about various plants. Stark markers like these may make gardening in winter easier. Knowing where bulbs or woody perennials live will help gardeners keep their plants intact as they prep for the upcoming spring.
Another interesting way to identify plants is with a label that has chalkboard paint. This makes your labels reusable and adaptable to different needs. This kind of tag is especially useful to gardeners who plant lots of annuals or for those who prefer to garden indoors. Apply this paint to a container, and write your info on the pot in chalk.
Printed Labels

One cool way to include markers in your garden is to print out photos of the plants you’re growing. This way, you know what the plants look like before they sprout, and you know what to expect. Having this right next to your sprouts is so helpful, especially for young plants. Similarly, labels that have an illustration or even just the name of a plant help.
When you develop these printed labels, provide some length of stake or stick to put the label on. Note that some metals will rust when exposed to the elements, and some wood will hold up longer than others.
Indoor Plant Labels

Indoor gardens give you so much more to work with when it comes to labels because you don’t have to deal with the elements. And you can work in any season. Depending on the space, you could be working with a better variety of plants too.
While you may not deal as much with trees or shrubs inside, you can get much more into the organization aspect of each plant tag. Any material – wood, plastic, metal, or even a terra cotta pot – works. Label whole containers, or write your label on a piece of paper. Get creative!
In more humid settings, consider weatherproofing your labels, just as you would in a more hot and humid season. A small herb garden adorned with cute tags stuck in the soil gives your indoor garden charm. Tiles are a great option here too! Adorn your garden with blue tiles with silver permanent pen on them, sealed with a spray sealant to make them last.
Weather Proofing

We have touched on this somewhat, but here are some more tips on weatherproofing your label for an outdoor garden. Consider the elements in this process: sunlight, rain, and wear from the age of your label. You don’t want to have to redo all the labels you’ve created after just one season!
Waterproof them with various sealants and resins. Plastic covers and heavy-duty laminates are designed to last more than one season. Certain wood is longer-lasting and better suited to withstand outdoor conditions. Staining the wooden stake where your label is affixed will provide an extra layer of protection.
Placement of your label is important too! Keep it out of the way of irrigation lines near shrubs in your herb garden. Similarly, don’t put tags in areas where they’ll get trampled or where the plants will grow over them. You don’t want to have to search the garden endlessly to find lost tags.
Along the same lines, consider replacing older tags in rainy or snowy seasons if they aren’t designed to withstand those conditions.
The type of pen you use will determine how long your writing lasts. Check out the shop for a pack of 5 Garden Art Markers that are UV-resistant and water-resistant, perfect for your plant markers and tools.
Frequently Asked Questions
How do I make my own plant labels?
There are so many ways to make your own garden tags. After you’ve done your planting for the season or even ahead of sowing, develop your own labels based on your needs and interests. The list above will help!
How do you make permanent plant markers?
You can hammer or etch metal or even make a label that is plastic with permanent pen writing on it. The garden label topic can seem pretty limitless.
What does the P mean on a plant label?
P refers to the phosphorus needed for fertilizer to be applied during the active growing season.
What information should be on plant labels?
Really, it’s whatever information you need handy during the season. It can be as complex or as simple as you’d like.
How do I keep my plant labels from fading?
Weatherproof them with various sealants, stains, or laminating sheets. Which you choose depends on your situation.


