How to Harvest Worm Castings 4 Ways
Once your worm composting bin is full, it's time to start harvesting worm castings. But how? Worm expert and founder of Urban Worm Company Steve Churchill teaches you 4 easy harvesting methods.


Contents
The first step in successful vermicomposting is keeping the worms alive, reproducing, and recycling your food scraps and organic waste into worm poop, or beautiful worm castings. The second step involves harvesting worm castings, ideally while disturbing the worms as little as possible. This yields you a relatively worm-free humus.
Let’s discuss harvesting castings, so you can put this “black gold” to good use in garden soil, around fruit trees, and in seed starting mixes. You’ll experience plant abundance as a result.
How Earthworms Respond to Their Environment

As you may already know from our types of composting worms article, our wiggly friends of the epigeic variety (most often red wigglers) will work in the top layer, at about 6-8 inches of compost, leaf litter, or lightly-packed soil.
This is even more true when there is a rich food source on the surface of the vermicompost. Watch how worms respond to pumpkin, cantaloupe, watermelon, or most other members of the curcurbit family. The fairly rapid decomposition of these fruits creates a blooming microbe population that the worms find very tasty.
While the worms are attracted to the all-you-can-eat microbe buffet, they are also attracted to moisture. This is why a poorly ventilated and overfed worm bin will have excess moisture pooling at the bottom. And lots of worms hanging around.
But one thing all earthworms hate is sunlight. They will do whatever they can to avoid bright lights.
Knowing what the worms find attractive (and what they find repellent) will help you in your ability to separate your worms from your worm castings.
4 Easy Methods to Harvest Worm Castings
When you’re ready to use your worm-powdered garden resource, follow any of these methods to harvest your worm castings.
Manual Sorting

Manually sorting thousands of worms (there are about 1000 red wigglers in a pound) from vermicompost is certainly possible, but most definitely tedious!
Some hardcore vermicomposters find sorting worms to be a pleasant way to spend hours on end, sort of like knitting. But if plucking worms from their poop with your own hands isn’t your cup of tea, try one of the methods below!
Bait Method

This method is also more about removing the worms from the vermicompost rather than harvesting worm castings, but it’s all the same.
Intentionally don’t feed the worms for a couple of weeks. Then, give them a rich, quickly decomposing fresh food like pumpkin on the surface of their worm bin. This will get the hungry worms to congregate near the moist food source.
Wait 24 hours or so and simply skim the top four to six inches of worm-rich vermicompost out of your worm bin. What’s left won’t be pure worm castings as it is likely to have some unprocessed material. But unless you’re selling your worm castings to picky customers, having a vermicompost that looks like ground coffee isn’t that high of a priority anyway.
Another hack for using the bait method is to put some worm-rich food waste in an onion bag and bury it in the top few inches of your vermicompost. This also works better when you abstain from feeding your worms for a week or more.
Come back a day later and pull your onion bags (which will be full of worms) out of your worm compost. Then spread the worm poop on your garden for plant abundance.
Light Method

Worms are photophobic, a fancy of way saying they hate light. They will do their best to dig themselves back into darker environments.
I find the following method to be tedious, but also a little fascinating. It goes something like this:
- Place a pile of vermicompost on a flat surface under a bright light.
- Wait a minute or so as the worms work their way into the vermicompost to escape the light source.
- Scrape the top and sides until you encounter wiggling worm meat.
- Repeat until all you have is a pile of worms.
To speed it up a bit, form an assembly line of vermicompost piles. Work one pile at a time, letting the worms escape the light in the other piles.
Screening

Harvesting worm castings with a screen is the chosen method of most large-scale vermicomposters. Usually, larger-scale producers will run it through a slowly rotating cylindrical screen to automate the process.
I can attest that this is by far the quickest way I have ever harvested worm castings. It is also going to be the most traumatic for the worms.
Because the screens, normally made from either hardware cloth, will only let fine material through to the catch below, almost all of your worms and the coarser material (called “overs”) will exit the end of the trommel.
However, commercial trommel harvesters are expensive and will be well beyond the needs of home vermicomposters.
There are lots of flat, manual screening solutions that DIYers have come up with. Kevin created a really cheap and easy DIY soil screener that can be used to screen worm castings as well:
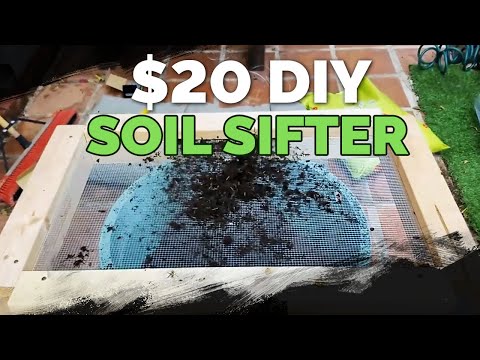
Screening your worm castings like this is the best of both worlds. It’s inexpensive, easy to use, ergonomic, and can be made with off-the-shelf material. It also screens an appropriate amount for a home vermicomposter.
Harvest With The Urban Worm Bag

Nearly every commercially made worm bin exists to make the harvesting process a little easier. Stackable plastic tray systems assume the worms will climb into richer food sources in the trays above, leaving worm castings in the trays below.
To similarly leverage the upward migration of worms, but in a more aerobic environment, I developed the Urban Worm Bag. This is a breathable continuous flow worm bin that allows you to feed through the top and collect rich, lively, worm-free castings from the bottom. You can add them to add them directly to your garden with no risk of burning your roots.
No sifting, sorting, or screening. And adding new bedding is a cinch!
Urban Worm Bag Eco: Made from Recycled Plastic Bottles!

Made with recycled plastic bottles in North America!
The Urban Worm Bag Eco is the newest in the line of Urban Worm Bags. It has identical form and function to the popular Urban Worm Bag Version 2.
It has the same dimensions, the same patented removable bottom, and the same coloring.
Frequently Asked Questions
How often do you harvest worm castings?
You can harvest worm castings every 3 to 6 months after establishing your worm colony. Then make a compost tea of them or add them to soil.
How long do worm castings last in soil?
Worm castings will last exponentially longer than regular soil and provide plant abundance in the process. When you add them to garden soil, either whole or in an actively aerated compost tea, they should provide nutrition for 6 times the average 2 to 3-year lifespan of regular potting soil.


