15 Tips For Growing Beautiful Roses This Season
Getting started growing roses can be intimidating. Luckily, their fussy reputation is exaggerated! Armed with knowledge of their basic needs, any gardener can grow beautiful roses. In this article, gardening expert and rose enthusiast Danielle Sherwood shares 15 of her top tips for gorgeous blooming roses!


Contents
Have you fallen in love with roses and want to add some to your garden this year? Maybe you bought a house with established roses, and want to provide them with good care? The first thing to know is that these popular flowering plants aren’t nearly as fragile as they’re made out to be. Green thumb or not, you too can grow beautiful roses!
For me, the biggest danger in becoming a rose gardener is that I simply buy too many. As a busy mom, there would be no way I could keep up with my collection if they were as high maintenance as claimed. I’m a fairly lazy, no-stress gardener, and I always have enough blooms to share with friends. If I can do it, so can you!
If you’ve been worried that roses are too complicated for you, this is your sign that they don’t need to be. To help you get started, here are some of my top rose growing tips, so you can enjoy heavenly scent and gorgeous flowers all season long!
Pick the Right Rose for the Right Place

It’s important to know your climate and the conditions of your garden to find the variety most likely to thrive. Often, rose gardening failures are just due to planting the wrong rose for your weather, soil, or location in the garden.
Even if you live somewhere where winters dip below -50℉, there’s a rose that can handle it. Cold climate gardeners should buy roses grown on their own roots rather than grafted varieties.
If you have hot, humid summers, you want a variety resistant to black spot and mildew. I have a pesticide free garden, so I always look for roses rated high in health and disease resistance. Gardeners in areas prone to drought will want roses that can withstand dry spells.
So, how do you find this information? The first step is knowing your USDA hardiness zone, and choosing a rose adapted to yours. This will make sure it won’t get too cold for proper growth. Next, ask your garden center for advice on varieties that do well in your area. If ordering online, read the description, which will tell you the rose’s preferred environment.
The key here is not to fall in love with a specific variety because it’s pretty, and then have to spend your summer trying to keep it healthy. There are beautiful options for every garden- so make sure you pick one that will be at home in yours.
As a general guideline, roses prefer 6-8 hours of direct sun per day. If a variety can handle some shade (some even like it!), it will be indicated on the nursery tag or online description. They prefer well-drained soil with a pH between 6-6.5, and some room to grow free of competition from the roots of trees and other large shrubs.
Plant in Spring or Fall

While it’s still possible to plant in midsummer, they don’t like to be moved in the heat or the middle of their bloom cycle.
In early spring, temperatures are usually still cool enough to allow a rose to get established before it faces the summer heat. Fall is another good time, as temperatures are milder and won’t stress your new rose. However, make sure you plant at least 6 weeks before your region’s first frost date.
If you stopped by the nursery in July and just couldn’t resist picking up a new rose (I can relate!), you can still grow it successfully. If this is the case, buy a potted, rather than a bare-root rose.
Bare-root roses often come dormant from online nurseries, and look like a bundle of canes attached to naked roots. While a great option, they need time to get established before breaking dormancy, and the heat of summer could damage them.
If you’re planting a container-grown rose during high temperatures, just keep an eye out for signs of thirst or heat-stress while it settles in.
Dig an Ugly Hole

One of my favorite sayings from rose gardening guru Paul Zimmerman is to “Dig an ugly hole!”. Why an ugly hole? You want to dig an irregularly-shaped hole with lots of fissures and tunnels for your rose’s roots to expand into, rather than a nice, clean circle where the roots have to work harder to move outward to reach nutrients.
Make sure to dig a hole deep enough to cover the bud union (the knobby area below the canes and above the root). Opinions vary on this one, but I always bury mine to protect from wind damage, freezing temps, and sucker canes.
Next, backfill with your native soil. When I started out, I thought I should fill my new rose’s home with the best quality soil possible.
The trouble is, the rose won’t want to spread out once it reaches the boundary of this nutrient-rich soil, encouraging roots to coil back on themselves rather than spread out. Instead, use your native soil, no matter how nutrient-poor, and help your rose out with fertilizer and mulch.
Mulch

Never skip the mulch! This layer is valuable for all your plants, roses included. Organic mulch conserves moisture, stabilizes soil temperatures, cuts down on weeds, and breaks down to enrich the soil.
After planting, add 3-4 inches of mulch around the base. Straw, pine needles, chopped leaves, and wood chips are all great choices.
Provide Plenty of Room

In my opinion, bare soil is just a spot waiting for a new plant. But when planting roses, good spacing is critical for airflow and root expansion. Plants without good airflow or room for their roots will be susceptible to disease and stunted growth
Always look at the mature estimated size of your new rose, and make sure you’ve provided enough space for it to grow. While 2-3 feet apart is a good general rule, some varieties stay very compact, and others grow into massive sprawling shrubs. Save yourself future hassle by planning ahead.
If you’re lacking in space, consider container growing climbers that will maximize your space when trained vertically. You can also pick beautiful mini-roses, or container-friendly varieties.
Container Roses Need Different Care

Container gardening is an awesome option for apartment dwellers or anyone with limited space. There are many rose varieties that grow beautifully in pots.
When selecting a container for your rose, the most important thing to look for is good drainage. Roses don’t like sitting in soggy soil, which can lead to root rot.
If you purchase a container without holes in the bottom, either drill them yourself, or keep the rose in a slightly smaller pot inside the container, lifting it out and letting it fully drain before replacing after watering sessions.
Terracotta pots are a classic, rose-friendly option, as they’re porous and allow roots to breathe. They don’t heat up as fast as metal or plastic in summer, and insulate in winter. Unfortunately, if you live in a region with very cold winters, they have a tendency to crack.
Plastic pots also work well, but remember that they dry out easily, so you may have to water more often. Check your container rose often to ensure it’s not thirsty.
Roses grown in pots may deplete the soil more quickly and need additional nutrients via fertilizer. They also need more winter protection, because their roots are not as sheltered as those in the ground.
Don’t Fertilize Right Away

Don’t fertilize young, newly-planted roses until they’ve had a bit of time to get established. When first planted, sunlight and water is all they need! If you would like to give them a boost, use only organic compost, or a gentle liquid seaweed formula. This goes for bare-root roses as well.
Granular fertilizers can burn the roots with an overdose of nutrients, which can damage or even kill the plant. I learned this the hard way! When I tried bare-root roses for the first time years ago, I didn’t research their requirements and added a liberal amount of fertilizer in the hole when planting.
They soon turned black and gave up. Whoops! Let bare-roots leaf out first and consider giving baby roses one season in the garden before supplementing with fertilizer.
Feed in Spring and Summer

For strong plants with abundant blooms, fertilize established roses 3 times a year: when they grow new leaves in early spring, after their first flush of flowers, and in midsummer.
Roses do well with generous amounts of organic compost and seaweed or alfalfa-based fertilizers. You can also start in spring with a slow-release granular fertilizer to provide nutrients throughout the season.
Look for fertilizers with a balanced ratio of the macronutrients nitrogen, phosphorus, and potassium (NPK). They also need micronutrients like calcium, magnesium, zinc, and iron.
Most fertilizers on the market will contain essential micronutrients. If you already grow tomatoes, you can use the same fertilizer for your roses!
After the first flush, you can fertilize again to encourage repeat bloom. In midsummer, fertilize one more time to give your roses energy for their final fall flush. Stop fertilizing at least 6-8 weeks before your area’s first frost. This will help them prepare for dormancy instead of pushing new growth that will die back in the cold.
Water Deeply, Less Often

Roses are thirsty plants, but they don’t like to be watered frequently. Overwatering causes droopy, disease-susceptible plants and yellow leaves. Underwatering leads to stressed plants, yellowing, and vulnerability to pests. Confusing, right?
Simplify things by watering your roses deeply, once or twice a week. Give them 2-3 gallons of water at a time. If you can, set up a drip irrigation system, which can be set to water at specific times, and delivers moisture right at root-level. You can also use a hose. Leave it to trickle at the base of the rose for 15-20 minutes, twice a week.
Fresh plantings may need watered more often until they establish. Check the soil regularly, and water when the top few inches are dry. All roses prefer to dry out a bit before being watered again.
Though roses can sometimes benefit from a spray with the hose, avoid regular overhead watering. Wet foliage encourages diseases like black spot and powdery mildew. Aim your hose at the base instead.
Deadhead to Encourage Rebloom

I always think of Grateful Dead fans when I say this, but deadheading is actually an important garden habit (feel free to dance around and listen to the band while you do it, though).
Spent roses withering on the bush delay rebloom and look untidy. Self-cleaning varieties drop old blooms and rebloom repeatedly without help, so pick one of those if you don’t want the hassle of this garden chore.
Deadheading is simply removing old blooms. You can clip off individual flowers right where they meet the stem, or clip down to a section with 5 leaflets (or you can be lazy like I often am and just snap them off with your fingers). New growth will soon sprout.
At the end of summer, stop deadheading so your rose can develop decorative hips. These are also a valuable food source for wildlife.
Companion Plant

This is the fun part! Roses, like all plants, benefit from diversity in the garden. A garden bed full of one species is more likely to attract pests and spread disease from one plant to another.
Build resilience in your roses by pairing them with plants that repel unwanted pests, encourage beneficial bugs, and attract pollinators. Planting companions with your roses will improve your soil health and cut down on weeds. Roses with long, leggy canes also look better with pretty plants in front of them.
Having a variety of different plants in your garden will keep the ecosystem in good health. Some of my favorites are Agastache (deer repellent and pollinator favorite), Nepeta (detested by Japanese beetles and other pests), and Bee Balm (hummingbirds love this one).
Also consider growing herbs like basil, thyme and sage with your roses. There are so many options, and they create not only a more beautiful garden, but a stronger one.
Take a Balanced Approach to Pests

Picture this: you’ve planted your roses, provided a great environment, and they’re blooming beautifully. But before you can enjoy them, the pests arrive, munching their leaves and destroying the flowers! Before your reach for pesticides, take a deep breath.
A bit of tolerance is key to enjoying your garden. Most garden pests that plague roses are a critical piece of the ecosystem that can’t be fully eliminated.
Chemical pest control creates an unhealthy cycle by killing the beneficial predators that eat pests, and eventually creating pesticide resistant bugs with no natural enemies! Worse, they’re unhealthy for you, your family, and pets, and don’t always work.
For most pests, like aphids and spider mites, a strong, concentrated spray with the hose will keep them manageable until their natural predators arrive. However, intervention is necessary for invasive species like the Japanese beetle. For large bugs, hand removal is the best way to manage them. Pluck them off and plunge them into soapy water (Don’t do this to caterpillars. Move them so they can feed the birds!).
If pests get out of control, try methods with the least impact on your garden and wildlife health first. Only take severe action when gentler methods fail. Your roses, your lungs, and all the good creatures who call your garden home will thank you!
Know When and How to Prune

The heaviest rose prune should be done in early spring, with a lighter shaping as necessary in fall. Begin in early spring when the bud eyes (nubs where new growth begins) are starting to swell.
The 3 Ds are a great way to remember what to prune. Remove anything dead, dying, or diseased. Remove any black canes and cut back to healthy green growth. Cut back canes that cross each other or point toward the interior of the plant, encouraging an open center with good airflow.
When cutting back, always try to cut just above an outward facing bud-eye (a swelling on the cane that faces the outside of your plant). This will help train your new rose canes to grow outward rather than into the center.
You can do a heavy prune to rejuvenate plants that were damaged in winter or grew too large for your space. Cut back the entire plant by a third, preserving the strongest outer canes. Soon, new healthy growth will appear.
Sanitize and Clean up to Prevent Disease
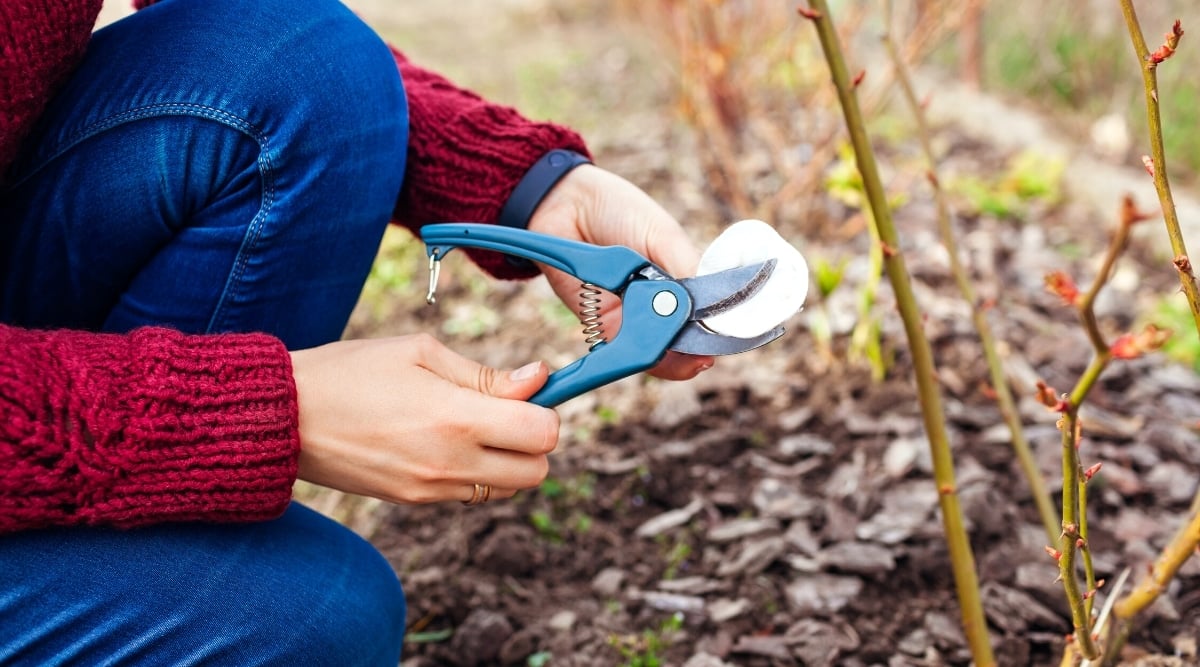
When pruning, make sure your tools are clean. Traveling from plant to plant without sanitizing your shears can spread disease. I carry a jar of rubbing alcohol with me, and dip my shears every time I move on from a plant.
Never let diseased or pest-ridden foliage remain on the ground around your roses to reinfect or spread to new plants. Many rose diseases are transmitted via spores in the soil or splashing water. Clean up around each shrub thoroughly, bag up the leaves, and dispose of them.
Provide Winter Protection as Necessary

When freezing temps arrive, I prefer to lounge with hot chocolate rather than panicking about my roses. If you’re like me, plant roses that can handle the cold. Winter-hardy roses don’t need extra protection. Let the snow blanket them and look forward to spring!
However, if you just can’t resist more fragile varieties or have lots of roses in containers, you might need to protect them when the winter comes. The roots of container-planted roses are more susceptible to freeze. Group them together, move them to a sheltered location, and cover the pots with black plastic bags for insulation.
Larger roses can benefit from additional protection to safeguard their roots. Build a hill of mulch around them with shredded leaves, grass clippings, or wood chips. You can also cover the base with a burlap bag filled with mulch.
Final Thoughts
Roses are just extravagantly beautiful shrubs. Their care doesn’t have to be time intensive or complicated. When you select roses adapted for your climate, growing them is fun and rewarding! I hope these tips helped you to see that just like the other perennials in your garden, they only need basic care and sunshine to thrive. So, go ahead- plant some roses this year. A garden just isn’t the same without them!


