Can You Grow Aloe Vera From a Single Leaf?
Are you thinking of growing an aloe vera plant from a single leaf? There are plenty of plants that can be propagated from just a leaf cutting. In this article, gardening expert Emily Horn walks through if Aloe can be grown from a leaf cutting, and if it's a good idea to attempt it.

Contents
One of the many things I enjoy doing is propagating plants. Whether it be dividing plants too big for their pots, taking dormant stem cuttings, sowing seeds for a summer garden or taking one simple leaf and creating a whole new plant is quite awesome and to an extent, empowering. And regardless of the hundreds of times I have propagated plants, finding out my attempts were successful brings great satisfaction.
My problem lies in what to do with all my new plants should my propagation endeavors be successful. All the new little plants make great housewarming gifts for new neighbors, or going to a plant swap and finding new friends with similar plant obsessions as you.
If you decide to venture down the path of cultivation, Aloe vera is a great plant to begin your propagation experimentation. Let’s dig a little deeper to find out if Aloe vera is a plant you can grow from a single leaf!
The Short Answer
Yes, you can grow a new aloe plant from just one single leaf. First, you are going to find a healthy leaf to take your cutting from. This leaf should be plump, green and free of any brown or black spots. Next take a clean, sharp knife and slice the leaf away from the aloe’s stem. Place cut aloe leaf on a paper towel out of direct sunlight and let the cut end callus over. After 3-5 days, the callus should have formed and you can plant your leaf in a well draining potting mix suited for cacti and succulents. After a few weeks, roots will have started to form, creating your new aloe vera plant.
How to Propagate Aloe from a Single Leaf
Now that we’ve established “yes” as the answer for growing aloe from a single leaf cutting, now comes the more fun part. First and foremost, it’s not just as easy as dropping a leaf in a pot. There are several important tasks you’ll need to do correctly to get a thriving Aloe plant from cuttings. Let’s take a look at each task, and what you can expect.
Water

Watering doesn’t seem like a step in successful aloe propagation, but it plays a very important role. Since you will be taking a leaf cutting, it is essential that your leaf has all the water it can hold. It may be upwards of a month before the leaf will have a root system capable of replenishing any moisture loss.
A day or two before you take your cutting, water the entire mother plant thoroughly. Thorough watering is when water penetrates the entire soil profile. This allows a plant to take up as much water as it currently needs.
There are two easy methods to ensure your mother plant has been thoroughly watered. You can either top water or bottom water. If you choose to top water, you will slowly pour water on the upper soil surface. You want to see the water coming out of the drainage holes in the bottom of the pot.
If you use the bottom watering method, place your aloe vera pot in a saucer of water. Then, let the water work its way up to the soil surface.
Depending on how dry the mother plant was prior to watering, one or two days is a sufficient amount of time for the water to reach all the leaves of the plant. If your leaf has enough water in storage, the greater the likelihood your cutting will be a success.
Find the Right Leaf

Which single aloe leaf you use to take your cutting may sound like a difficult decision. However, there are a few conditions to take into consideration for picking a healthy leaf.
Take a look at the mother plant. Does it have more growth on one side than the other? Is the mother plant leaning or top heavy and falls over easily? The heavy side would be a great spot to take your cutting from. The removal of extra weight of the leaf will help keep the mother plant upright too.
Inspect leaves for signs of disease or stress. If a leaf has black or brown spots, it is not a good candidate for your cutting. Are the leaves yellow? Skip these leaves for your cutting as well. Any insects such as mealybugs, spider mites or aphids? Now is not the best time to take a cutting. You will need to get the insect pests under control prior to propagating any new plants.
Healthy leaves are green, soft, plump and are without brown/black spots or brown tips.
Take Your Cutting

Watered the mother plant? Check. Found the leaf you want to use for your cutting? Check. Now, onto propagating aloe from a single leaf.
First and foremost, when you do any pruning, you want to make sure your tools are sharp and clean. Dull pruners or knives will create ragged edges. Those edges are difficult to heal properly. They can make way for diseases and give insects an easy route for infestation. The same goes for dirty tools. With many common plant diseases, unclean tools can be the vector in the transmission of viral, bacterial and fungal infections.
An inexpensive way to clean your pruners or knife is by using isopropyl alcohol. First, remove any stuck debris or sap using a stiff brush. You can’t disinfect tools if large debris keeps the alcohol from reaching the blade surface.
Next, dip a cotton swab, cotton ball, an old sock (seriously, the socks I cannot mend or find the match for work great-in 70% isopropyl alcohol). Carefully wipe the blade and the anvil/lower jaw of pruners, or blade of your pruning or florist knife. As the alcohol evaporates, it destroys the proteins and fats of bacteria, viruses, and fungi.
Once you have cleaned your equipment, you can begin to take your cutting. Careful of the surrounding leaves and stem, cut your desired leaf close to the stem where it is attached. I find using a knife makes it easier to take single aloe leaf cuttings. With numerous thick leaves surrounding the stem, it can be hard to fully open a pair of pruners to get a clean cut without slicing into neighboring leaves or cutting the stem.
If you want to take multiple leaf cuttings, be sure to clean your pruners in between each new leaf.
Leave to Callus

Now that you’ve taken your leaf cutting, aloe (like other cacti and succulents) needs some time to heal over the wound that was created by removing the leaf from the stem.
Similar to a scab, when the cut end begins to dry and shrivel slightly, the aloe leaf is starting to callus over. Calluses prevent diseases and insects from getting inside the plant tissue. It creates a seal over the end, keeping in as much sap as possible.
Place the cut leaf on a paper towel out of direct sunlight. It doesn’t have to be a paper towel, but some of the aloe vera sap may ooze out of the cut. The pigmentation inside the leaf may cause yellowish-green stains. After 3-5 days, the callus that has formed is sealed enough to begin the process of sticking your leaf cutting.
Plant Your Cutting

But before you plant your single aloe vera leaf, you will need to pick the right container and soil.
There are commercially available cacti and succulent potting mixes that will work well. You want a soil that is well draining and somewhat coarse, since you are trying to simulate a desert type soil.
Many cacti mixes contain a combination of organic materials. You may see peat moss, compost or leaf humus, and inorganic ingredients. Some inorganic ingredients like sand, pumice, or other large particles will create pore space in order to keep your cacti and succulents from staying too wet.
Because your cutting is just beginning to grow roots, fertilizer is not needed at the time of planting. In fact, the salts in many fertilizers can actually cause burns on the newly forming roots, which will inevitably cause stress to your new aloe plant.
Picking a Container

When selecting your container, be sure the pot has drainage holes. Since aloe vera is a desert plant, it prefers a well draining soil.
Even if you plant the aloe in a desert or cacti potting mix, if there are no drainage holes in the pot, excess water has nowhere to go. Roots that sit in water will begin to rot over time, causing the plant to decline rapidly in health, or be the reason for an early death.
If you are concerned that the drainage holes in the pot will make a mess or cause the soil to spill out during watering, there are a few easy tips to create a barrier for the soil to stay inside the pot, while extra water is able to drain away.
You can place a small piece of window screen inside the pot, covering the drainage hole. This keeps the soil particles inside when you thoroughly water your aloe.
Planting

Now that you have the correct potting mix and container, you can plant your single aloe leaf. In your prepared pot, fill the container to within ½” from the top with a slightly damp cactus potting mix.
Next, push your finger down inside the soil in the middle of the pot. This is going to create a hole for you to place your cutting, so the depth of your hole is going to be determined with the length of your leaf.
Gently slide the leaf into the potting mix, callused end down, until the bottom ⅓ of the leaf is below the soil line. Firmly push the soil back around the leaf cutting to make sure the leaf is making contact with the soil as well as to assist the leaf cutting with standing upright.
From the top, slightly water the soil surrounding the aloe leaf. This watering will eliminate holes in the soil profile that would keep the cutting from making direct contact with the potting mix. Direct contact is needed for soon-to-be-forming roots.
Even though the single aloe leaf is not an entire plant system yet, it will continue to photosynthesize. Place your potted cutting near a window so it can receive indirect light and water the soil regularly to prevent it from drying out.
Wait for New Growth

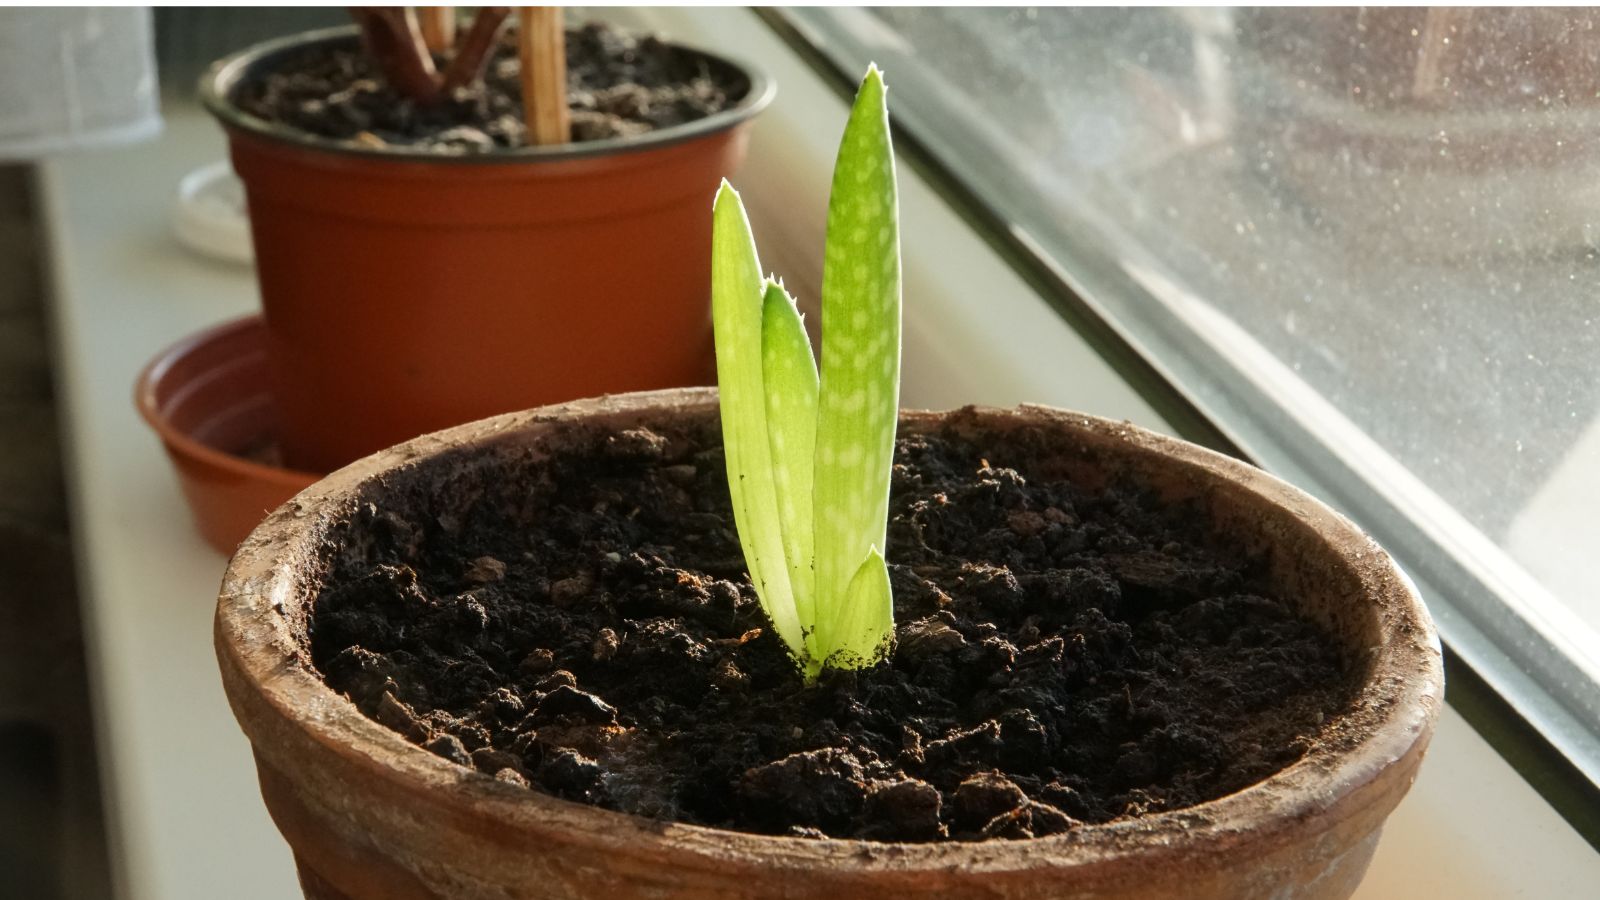
Now we wait! Within 3-4 weeks, your cutting will have begun forming a root system. As tempting as it may be to dig around in the soil to see if anything is happening, don’t. By poking in the soil, you can actually damage any existing roots.
The first signs of success will most likely be the emergence of tiny green shoots from the soil surface. These shoots tell you that the roots have indeed formed and the leaf cutting is now a fully functioning plant.
Over time, additional leaves will begin to grow. With this growth, it is wise to find a location in your home that receives at least 6 hours of indirect sunlight each day. Keep checking in on it, as any mother would do, to make sure its basic needs are being met.
Frequently Asked Questions
Does aloe vera need indirect sunlight?
Yes, they prefer indirect sunlight. Indirect sunlight is defined as sun rays that do not directly touch a surface. In the plant world, let’s say a window faces south or west, the window sill itself receives direct rays of sun, but 2 feet away from the window, the light is still bright, but not directly hitting anything. Or the light intensity is still bright, but passes through something like curtains, blinds or other window treatments, lessening the light intensity.
Do I need to fertilize my aloe vera plant?
Aloe vera prefers low nutrient conditions, so regular fertilization is not necessary. However, you may want to give your mature plant some fertilizer annually, in the late summer/early fall as it comes out of dormancy. That way it has plenty of nutrients available to thrive during its growing season.
Can you grow aloe vera in regular potting soil?
Regular potting soil is too heavy. And by heavy I mean that the soil doesn’t drain as much as aloe vera needs it to. If you choose to use a regular potting mix, I advise you to mix in sand, pumice or additional perlite to increase the pore space and drainage, at a ratio of ⅓ regular potting mix and ⅔ sand, pumice and/or perlite. There are cacti and succulent potting mixes available at your local garden center. Sometimes these specialty mixes are more expensive. However, if you need a small amount of soil, it would be more cost effective to buy the premade cactus mix than buying all the individual components yourself.


