How to Plant, Grow and Care For Iris Flowers
Are you thinking of growing Iris flowers this season, but aren't quite sure where to start? Whether it's Bearded Iris, or other types of Iris, these beautiful flowers can offer plenty of visual interest to just about any garden space. In this article, gardening expert Liz Jaros takes you through everything you need to know about growing Irises as well as their mainteance and care.

Contents
Flowering in late spring or early summer after most gardens have completed their first act but before the second one begins, iris flowers fill the gap brilliantly with their rigid, upright habit and ruffly, complex blooms.
One of the most easily identifiable flowers in the landscape, iris can be found growing wild on a mountainside or contained in the city and just about everywhere in between. A member of the Iridaceae family, the iris genus includes nearly 300 species and thousands of different cultivars.
Read on for a deep dive into their history, growing requirements, maintenance needs, and vulnerabilities as well as a closer look at some popular cultivars you might want to try in your own gardens!
Iris Plant Overview
|
Plant Type
Perennial, rhizome, bulb
Family
Iridaceae
Genus
Lilium
Hardiness Zone
3-10
Season
Late spring to early summer
Exposure
Full sun to part shade
|
Plant Spacing
12-24 inches
Planting Depth
1-6 inches
Height
6 inches to 5 feet
Watering Requirements
Minimal after establishment
Pests
Iris borer, aphids, thrips.
Diseases
Bacterial soft rot, botrytis, root rot
|
Maintenance
Moderate
Soil Type
Loose, well-drained.
Plant With
Tulip, allium, delphinium, dianthus
Attracts
Bees, hummingbirds, butterflies
Native Area
North America, Europe, Asia
Propagation
Division, Seed
|
About Irises

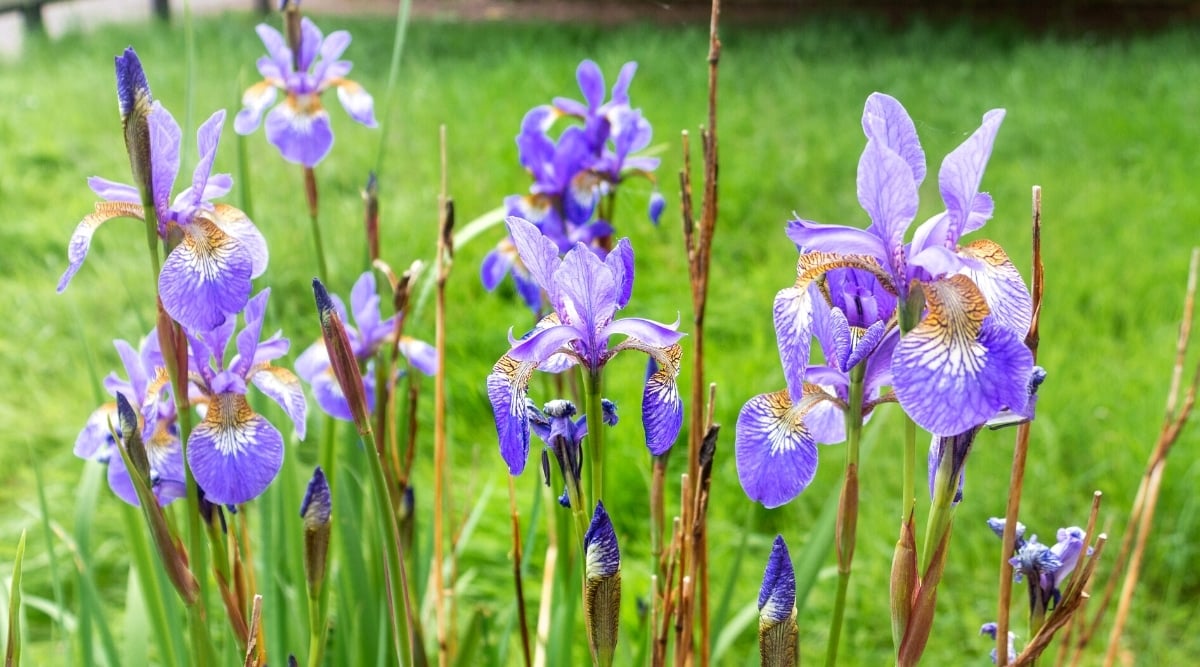
Iris varieties range in height from 6 inches to 4 feet. These perennials bloom in a multitude of colors with shades of yellow, purple, and white being the most common. Some irises bloom in colors so dark that the flowers appear black. They have a light, sweet scent that’s similar to the violet’s, and darker hued flowers often emit a stronger fragrance than those with paler petals.
Typically sorted into bearded and non-bearded categories, most irises have 3 upright petals called standards and three down-drooping petals called falls. Some have additional flower parts that give them a bearded or crested designation. Most grow from rhizomes, but some have bulbous roots.
Although most species grow best in temperate climates (zones 3-8), there are a few that give preference to warmer, more arid regions (zones 8-10). As irises are hardy and relatively easy to grow, paying close attention to their heat preferences is often the key to successfully growing this lovely flower.
Iris will thrive in a location with full sun and well-drained soil. They multiply easily if planted properly and require division every few years to prevent crowding.
Classifications
The American Iris Society divides the iris genus into three main groups – bearded, beardless, and aril – and there are several subgroups within these three categories. Irises are assigned to a particular group based on similarities in profile, heredity, and cultural requirements.
Familiarize yourself with the classification system before committing to a particular variety of iris and get to know a little bit about each one’s unique characteristics. You’ll give your iris game a competitive edge and up the odds of successfully growing this lovely garden gem.
Bearded

Like all iris species, blooms in the bearded category have three ‘standard’ petals that grow upright and three ‘falls’ petals that droop downward. The main distinction here is that bearded irises also have a thick, fuzzy strip resembling a caterpillar that runs down the center of each falls petal.
Bearded irises have thick, broad, swordlike foliage and substantial, rhizomatous roots that grow near the surface. Sometimes referred to as German iris, most bearded cultivars are derived from species that originated in central or southern Europe.
Irises in this class require full sun and prefer neutral to slightly acidic soil. Official subcategories in the bearded group include Miniature Dwarf, Standard Dwarf, Intermediate, Border, Miniature Tall, and Tall Irises.
Beardless

Flowers in this group are smaller and do not have ‘beards’ on their petal falls. Foliage is thin, grasslike, and not as firm as bearded varieties but still very upright. They are often spotted near the edge of ponds and lakes.
Most cultivars in the beardless iris family originated in Asia. They can tolerate a bit more shade and prefer soil that is slightly more moist than their bearded cousins require. They also require a slightly higher acidity level.
Official subcategories in the beardless class include Spurias, Siberian, Japanese, Louisiana, Pacific Coast Native, and Species irises.
Arils

This class includes irises that are native to the mountains and deserts of the Middle East. Aril irises prefer conditions that are hot and dry. Their falls also have beards, but they are scraggly and not as prominent as those on their more temperate, bearded relatives.
Arils are distinguished by a significant amount of veining, and something called signal spots on their falls. They also come in the most diverse array of colors, including chocolate, maroon, mauve, bronze, and blue. This group is subdivided into Oncocyclus and Regelia categories.
Officially, this class also includes hybrids that are derived from an Aril parent and a Bearded or Beardless parent. If you see the term ‘arilbreds’ assigned to a plant you’re considering for the garden, that means it’s a hybrid and not a true aril, so its growing requirements may be closer to those from the other two categories. Always double check.
How to Grow
Irises can be started from true seed, rhizomes, or bulbs and spread easily by clump. Do not expect blooms to be particularly prolific during an iris’ first year or two, as they often take a while to establish.
Although irises are generally considered easy to grow, they do have particular preferences with regards to planting depth, sun exposure, watering methods, and maintenance techniques. And there are some key differences between the three main iris groups. Here’s a rundown of the iris’ basic growing requirements:
Light

All bearded iris require full sun in order to thrive. This means at least 6 hours of direct sunlight, ideally concentrated in the early to middle part of the day. Some varieties may wilt in hot afternoon sun, so pay attention to your specific cultivar’s unique preferences.
Beardless iris can tolerate a bit more shade or some dappled sunlight, but they should receive as close to 6 hours of direct sun as possible. And they will not likely grow well in locations with scorching hot afternoons.
Soil

The best time to prep a bed for an iris installation is actually the season before you intend to plant. This will give the soil a chance to settle and organic additives a chance to fully incorporate. It’ll also give you a chance to monitor the bed for proper drainage and make adjustments to the grade.
If you don’t have that kind of time or patience, prep beds at least 2 weeks before you plan to start popping irises into the ground. Loosen the top 10 to 12 inches of soil with a shovel or pitchfork and work some compost into the mix. Then assess for drainage and/or soil content issues.
If soil is heavy or dense, work in some humus, peat moss or sand. If soil is dry and crumbly, add some compost or manure. Let sit for as long as possible before planting, turning over the bed with a pitchfork every few days.
When it comes to pH preferences, most irises prefer soil that is slightly acidic and will do well with a level between 6.5 and 6.8. But there are some irises, particularly in the beardless group, that will thrive with a slightly more alkaline soil content.
Have your soil tested, if possible, and amend your bed to your particular iris species. Work some lime into dirt that is too acidic or sulfur into dirt that’s overly alkaline.
Water

Newly planted irises need regular watering until their roots are established, but take care not to flood or waterlog them. A long, slow soak is preferable to a hard, fast blast.
If you’re planting in fall, water irises evenly until the ground freezes, making sure the dirt never completely dries out. If you’re planting irises in spring, water evenly until they are done flowering. After that, monitor the top 5 inches of soil for the rest of the season and water only when dry.
Beardless irises are a bit more tolerant of swings in soil moisture than their bearded counterparts. They can handle beds that are occasionally very moist but also occasionally very dry. This is why they are often selected for plantings in natural settings or near bodies of water.
Climate

Most iris varieties and all bearded cultivars prefer temperate regions where there is a cold winter and they will experience true dormancy. These irises can be left in the ground year round and do not suffer during extreme winters.
Although all irises are all considered hardy in zones 3-9, there are a few beardless cultivars that won’t grow well in a zone lower than 5. Pay close attention to your iris grower’s plant tag to determine if you can safely plant a beardless cultivar in a colder part of the world. Cultivars that can grow in lower hardiness zones are cold-friendly perennials that are well adapted to those growing conditions.
Aril irises are typically hardy down to zone 7 and must have hot, dry conditions for a good chunk of the season. They will tolerate some spring rain and freezing winter temperatures if the growing season is consistently arid, but they are not a good choice for regions with high humidity levels and rainfall totals.
Temperature

Most iris varieties can handle winter temperatures down to -25 degrees and all irises can handle hot summers. But some, particularly from the bearded family, will wilt in temperatures that are consistently above 90. Aril irises, on the other hand, will thrive in regions with extremely warm temperatures.
Location

Irises make wonderful additions to a wide variety of settings. They are equally at home in a cutting garden or mixed perennial bed as they are in a rock garden or a naturalized creek bed. They can be formally planted in a parterre garden section or potted up casually in a steel drum on the patio.
Only consider locations that have excellent drainage, as all irises are vulnerable to root rot and will not grow well in beds with any kind of standing water. Bearded irises should be located in beds or containers that will receive at least 6 hours of sun, ideally in the first half of the day.
Beardless varieties can be planted near the forest’s edge or under a light tree canopy as long as they’ll receive at least four hours of direct sunlight each day.
Aril irises naturally thrive in open, arid locations like a mountain top or hillside, but these conditions can be successfully simulated with sandy soil, raised beds, and boulder gardens.
Fertilization

At least two weeks prior to planting, work a 6-10-10 fertilizer into the soil. This ratio emphasizes phosphorus and potassium over nitrogen, encouraging floral development rather than vegetative growth. If organic feeding is preferable, bone meal will have a similar nutritional makeup.
Subsequent applications of the same product should be made in spring after shoots emerge from the ground and in fall after flowering is complete. Always water evenly and regularly for several weeks after an iris has been fertilized.
Planting

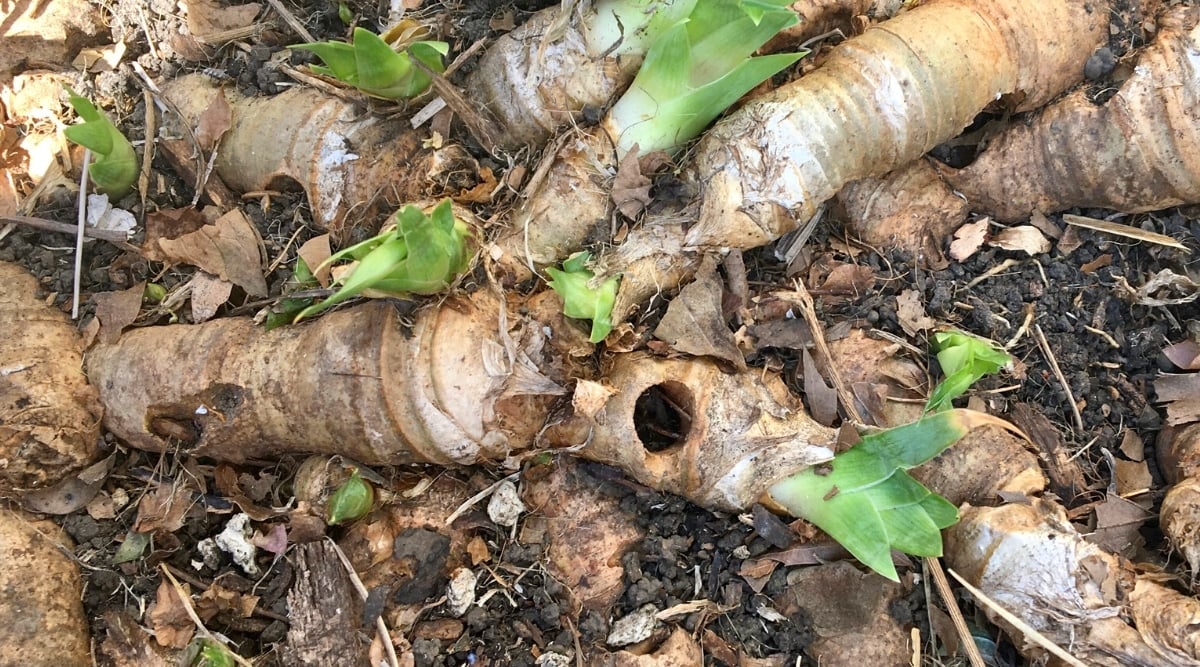
Proper planting depth is perhaps the single most important factor in determining the fate of a newly installed iris. The rhizomes, or fleshy potato-like parts, need to be located at or just below surface level if your iris is to flower properly.
The second most important planting factor is space. Irises need plenty of air flow and room to ramble, as they will spread quickly after their first few years in the ground. A good rule of thumb is leaving 12-24 inches between plants, depending on variety and mature size.
Gardeners who intend to divide diligently and prefer a more close-knit bouquet can break these rules as long as they’re willing to stay on top of maintenance in future seasons. And as long as there is still adequate air circulation.
Begin by digging a hole that’s roughly four inches deep and slightly wider than the size of your rhizome, then build a ridge in the middle of the hole.
Bearded irises should be placed on top of the ridge so that crowns sit right at ground level and root hairs extend down the sides of the ridge. Beardless varieties should be planted in the same manner with rhizomes an inch or two below the surface.
Backfill with loosened soil so that bearded rhizomes are just barely visible and beardless rhizomes are just covered up. Tamp down the dirt around them, and water immediately.
Dutch, English and Spanish iris varieties, which fall under the Beardless category, are the exception to these planting rules, as they are grown from bulbs. These irises should be planted 6 inches deep in a 4-inch wide hole with the pointed end facing up, then backfilled and watered just like their rhizomatous cousins.
Propagation

Iris will produce seed that can be harvested at the end of the growing season but it’s not the recommended method of propagation.
Since seeds will contain DNA from a multitude of parent plants and not the carefully cultivated variety you purchased from a grower, your new iris will not be ‘true to seed’ and will not likely produce the best and brightest iris specimen.
By far the easiest and most efficient means of propagating iris plants is through the asexual reproductive process known as division. Here are the steps:
Division Steps
-
- Begin in fall, 6 to 8 weeks after blooming is complete.
- Dig up the entire iris plant and place it on a tarp or hard surface.
- Use a scissors or pruner to cut foliage down to ⅓ of its height.
- Using a sharp knife, begin cutting root sections away from the outside of the clump.
- Make sure each new section includes some rhizome.
- Discard the central dead zone if there are no shoots present.
- Replant each section in a new location as you would a new iris.
Maintenance
Although they are not particularly high maintenance plants, there are a few basic garden tasks you should perform regularly in your iris gardens.
Mulch

A 2-4 inch layer of mulch can be applied in fall to retain moisture, discourage weeds, and prevent erosion, but use a light hand and select material that will not smother your rhizomes.
Pine straw, fallen leaves, shredded hardwood, and compost can all be used effectively to protect your irises during the winter. Just remember to pull the material back and thin it out a bit in spring before shoots emerge.
Deadhead

Spent iris flowers should be removed with a pruning tool as soon as they have finished blooming as this will direct root energy toward next year’s flower production.
Taking care not to cut any leaves, follow the stalk of a faded bloom down to the plant’s crown and snip off near the base.
Cutback

Do not cut foliage down to the ground after flowering is complete. Leaves are still photosynthesizing and directing energy toward next year’s blooms.
Iris foliage must be left in place until the first frost turns them brown. When the time is right, cut them down to about four inches above ground level.
Division

Perform this garden task every couple of years in fall (see technique above) to reduce crowding and make more plants.
Signs of an iris that needs division include a dead center zone or a mature plant that suddenly stops flowering. It may also be indicated by rhizomes that are buckling or mounding well above the soil level.
If a thorough division is impractical or spring has arrived and you suddenly notice severe crowding, drive a sharp, flat spade through the roots to shave an outer section of the plant off cleanly. This process is known as thinning and can be an effective, albeit lazy and temporary way to address iris crowding.
Popular Varieties
With so many different varieties of iris produced for retail consumption, selecting a few to try at home can be an overwhelming task. To help clarify some of the key differences, we’ve put together a look at the most common iris species and recommended a few cultivars from each group to look for at your local nursery:
German Iris

|
|
botanical name Iris x germanica |
|---|
This is the commonly accepted botanical name for all irises in the bearded category and it contains all the subgroups (dwarf, miniature, tall, intermediate, etc.). German irises prefer full sun, are hardy in zones 3-10. These perennials bloom in early to mid-spring. They range in size from 6 inches to 4 feet.
Popular cultivars include ‘Red Zinger,’ ‘City Lights,’ and ‘Concertina.’
Dutch Iris

|
|
botanical name Iris hollandica |
|---|
This common iris species is grown from a bulb, rather than a rhizome and is hardy in zones 5-9. Dutch iris flowers are beardless, enjoy full sun, are usually 3-4 inches wide, and are typically multicolored.
Plants in this species are more delicate than their bearded relatives and do not live as long in the landscape. Dutch Iris are often included in the cutting garden for their long vase life.
Popular Dutch iris cultivars include ‘Blue Magic,’ ‘Yellow Queen,’ and ‘Apollo.’
Japanese Iris

|
|
botanical name Iris ensata |
|---|
Irises in this species bloom in mid-summer and average between 2 and 4 feet tall. They are easy to grow and are known for being the iris most tolerant of rainy conditions.
Japanese irises can tolerate a bit more shade than their German counterparts and can live in heavier soil. Plants in this species are often selected for naturalized areas or near the water’s edge.
Popular cultivars include ‘Alpine Majesty,’ ‘Blue Spritz,’ and ‘Frilled Enchantment.’
Siberian Iris

|
|
botanical name Iris siberica |
|---|
While flowers are typically smaller and not as showy as those from the bearded species, Siberian irises are prized for their attractive foliage.
Lasting long after blooms have faded, leaves in the Siberian species are thin, upright, and brightly colored, resembling an ornamental grass. Siberian irises are hardy in zone 3-4 and average between 3 and 4 feet in height.
A few of the cultivars you might encounter are ‘Charming Billy,’ ‘Snow Queen,’ and ‘Pink Haze.’
Pests & Diseases
While they are known for being easy to grow, irises are vulnerable to a handful of pests as well as some bacterial and fungal conditions. Here’s a look at those most commonly found in backyard gardens:
Iris Borer

The iris borer is by far the genus’ biggest foe and can cause major damage in a hurry. Look for pink, caterpillar-like creatures with black spots on your plant’s leaves. Mature insects will be about 1.5 inches long.
Damage from iris borers will include small holes and jagged leaf edges. Look for early signs of it in spring, right after eggs have hatched. Eventually, borers work their way into stems and down into rhizomes or bulbs, where their burrows will soften the tissue and invite rot along with other diseases.
Tidy iris beds will reduce habitat for overwintering borers, so keep weeds and debris out of their vicinity. Control methods include careful monitoring and hand removal. Always cut irises down to the ground at the end of the season. And inspect roots for infestation before dividing/transplanting.
Aphids

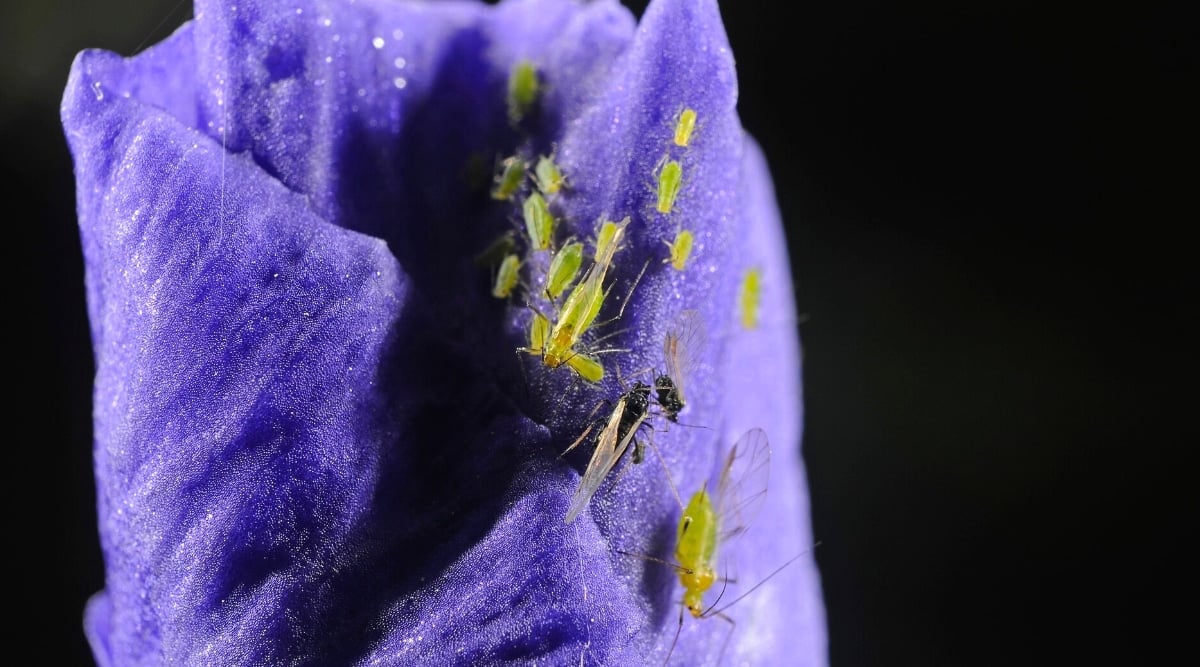
The second major threat to iris health is aphids, which pierce plants leaves and suck on their juices. Look for tiny bugs that are pink to mealy white in spring. Later signs will include leaf drop and/or the splotchy symptoms of mosaic virus.
Aphids can be controlled by manual removal with a strong hose spray or the application of an insecticidal soap. You can also introduce or all predatory insects like lacewings, lady beetles, and spiders to have free range in the garden.
Bacterial Soft Rot

Initial signs of this destructive iris enemy include leaf die back at the tips. Later symptoms include yellow leaves and leaf drop. Squishy rhizomes and a foul odor are symptoms of the disease in its final stages.
Breaks in the rhizome caused by physical damage or insect infestation typically create the conditions for soft rot, so handle plant roots carefully and stay on top of insect control.
Dig up and examine the roots of irises if you suspect root rot is the culprit. Cut off any soft rhizomes and dispose of them, and leave roots out to dry for a few days before replanting. Irises with symptoms of advanced soft rot disease should be disposed of immediately.
Leaf Spot

If your irises’ leaves are dotted with small brown spots with water-soaked margins that eventually turn yellow, they are probably suffering from leaf spot. Advanced disease will be indicated by graying spot centers with black fuzzy tufts.
Leaf spot is a fungal condition, often invited by poor air circulation and overly wet conditions. So, make sure your iris plants are properly spaced and evenly watered.
Promptly remove leaves if fungus is suspected and consider excavating some of the soil around your plant, as leaf spot can overwinter in the ground. A mid spring fungicide application when emerging leaves reach 4 inches tall can also help mitigate this disease.
Botrytis

Indications of this deadly iris disease include new shoots with fewer leaves than previous years. Leaves may also be yellow or brown and have gray fungal spots. Rhizomes that are infected with botrytis will be dry, mealy, and soft to the touch. They may also have black, shiny granules on their surface.
Unfortunately, botrytis is always fatal, and your iris will ultimately die. To prevent the disease from spreading to other nearby plants, excavate the entire iris and as much of the surrounding dirt as possible. Dispose of the plant and closely monitor the area for future signs of mold.
Frequently Asked Questions
Are irises toxic to dogs?
Yes. A typical reaction includes non-fatal, salivary and gastrointestinal issues.
Can they change color from year to year?
No. A different colored bloom in your iris bed is likely the result of cross pollination with another nearby species and is actually a new plant.
Are they considered invasive?
Yellowflag iris (Iris pseudacorus) is the only iris with an official invasive designation. It spreads quickly through matted roots and crowds out other native species.
Is there an evergreen iris?
Zebra iris (Iris pallida) has stiff, variegated leaves that will remain evergreen in regions that don’t have harsh winters, but there are no true evergreen irises in zones below 5.
Final Thoughts
Close relatives of the iris include members of the crocus, gladiolus, and freesia families. They also bear some resemblance to the snapdragon, and their foliage is often confused with the daylily.
Diving into the language and classification system for irises can be a little overwhelming, but if you take some time getting to know the genus, you’ll be a better gardener for it.
Practice identifying bearded and beardless irises varieties on your strolls through the neighborhood or on trips to the botanical garden. Learn to recognize the thin, strappy foliage of a Japanese iris vs the thick, swordlike leaves of a German cultivar.
When you’ve taken the plunge and planted some irises in your own yard, be prepared to pass on what you’ve learned to your friends and neighbors. Irises spread quickly in just a few years, and you’ll soon be sharing your beautiful bounty with everyone you know.


